
Smart contracts in Python? Don’t worry if that line doesn’t make sense. So, this post will explore the steps of deploying smart contracts in Python and help you understand how to do it independently and concisely. Like my previous one, where I discussed how to Write Your First Smart Contract || Blockchain, I will break everything down before diving into deploying smart contracts in Python. For now, know that a “smart contract” doesn’t mean a contract that can adapt or change itself, like AI, haha. As long as you know that, you’re good to go.
Check that article out if you still haven’t provided some essential context for this article. Moreover, the goal of this article is to be a complete guide for smart contracts in Python– your one-stop place.
The GitHub repo containing the complete code used and the Python file to deploy Solidity smart contracts is essential to share here. Head over to access/edit it to your liking.
Another thing that I want to recommend is to make a habit of reading the docs. For instance, the Web3.py documentation helps understand how to interact with deploying smart contracts in Python.
Here are a few limitations to that approach and the reasons to deploy the smart contracts in Python:
Limitations of Solidity on Remix IDE:
- Can’t integrate with large projects
- Limited support for testing or custom deployment
- Cannot save plugins
Okay then, what do you need before starting? Here are a few necessary prerequisites.
Prerequisites to Deploying Smart Contracts in Python
- Python version 3.7 or above
- Visual Studio Code or Pycharm (or another IDE for Python Code)
- A Solidity smart contract
- Web3.py library on Python
- Solcx
- Eth_utils
- Ganache
- Dotenv
Why Python?
Python is perhaps the most versatile and most used programming language in 2022. Its popularity is expected to grow further, heading into 2022 and beyond. Hence, it should not be surprising that Python is also one of the languages for blockchain development. My reason for choosing Python for Web 3.0 purposes instead of Javascript is quite simple. I have been coding in Python for a couple of years now, and I finally feel like I have found a language that allows me to express myself without clawing my hair out at every obstacle.
In other words, I enjoy coding in Python. You can use the respective Web3 libraries on both Python and Javascript to interact with and deploy your smart contracts– as per your preference.
What is the Web3.py library?
Web3.py is a Python library that provides the tools necessary to interact with and manipulate smart contracts in Python. In other words, Web3.py allows interaction with Ethereum VM (virtual machine) using Python. This leads to its use in dApps, or decentralized applications, for interacting with smart contracts, sending transactions, reading block data, and other cool use-cases.
Web3
Run the following command in the terminal to install Web3.py on your system:
$ pip install web3Solcx
Run the following command in the terminal to install Solcx on your system:
$ pip install py-solc-xEth_utils
Run the following command in the terminal to install Eth_utils on your system:
$ pip install eth-utils==1.1.2Dotenv
Run the following command in the terminal to install dotenv on your system:
$ pip install python-dotenvHow to get Solidity Smart Contracts to Deploy in Python?
If you have been following our blog, you know I wrote a post on Writing a Smart Contract in Solidity not too long ago. But if you have no prior experience, you can first follow that post and write your first smart contract in Solidity. However, it doesn’t mean you won’t learn anything from this post; you’ll only have a more challenging time unless you get back to this later.
On the other hand, if you have a little experience but still need help, that post will be helpful. But if you want to follow along with this post, you can find a lot of open-source smart contract files on Github.
I have also uploaded the smart contract file that I’ll use in this tutorial. Okay, now a few more things before diving into the steps to deploy a smart contract in Python.
What is Ganache?
Ganache is a platform to perform blockchain operations locally on our machine before deploying a not-perfect file or how we want it to be. In other words, it’s a test blockchain where you can track transactions, inspect changes, and, most importantly– do it locally by creating your own Ethereum blockchain.
Depending on whether you like a UI or CLI, you can use Ganache CLI or Ganache.
Deploying Smart Contracts in Python: Complete and Comprehensive guide
With all the essential information done, let’s start the real stuff. I’ve divided it into some steps to make it easy for you to follow along.
Step 1: Import Necessary Libraries in Python
Here are some useful libraries for this project:
from eth_utils import address
from web3 import Web3
import os
from solc import compile_standard, install_solc
from dotenv import load_dotenv
import json
Step 2: Read the Smart Contract file in Python
Let’s get groovy, then, shall we?
In the beginning, you must read the smart contracts that you have written or downloaded for the project in Python. The smart contract I am using is “SimpleStorage.sol“.
I am sure you already know about the “with open() as file” syntax from the os library to read/write/append files in Python, but let me clarify.
“r” means “read-only.” The reason for using read-only is simple: you only need to access the contents of the solidity smart contract file and not write or append it.
Use “as file” to assign the file after reading its content to a new variable “simple_storage_file” to read a little later on.
with open("./SimpleStorage.sol", "r") as file:
    simple_storage_file = file.read()
Step 3: Compiling Solidity Smart Contracts in Python
A library called py-solc-x needed to compile the smart contract before it was ready to be used with Python. The benefit of using py-solc-x over py-solc is that the former is maintained.
The purpose of installing and importing py-solc-x is to use the compile standard function. This function does the behind-the-scenes work of compiling as done by the solidity compiler on the remix. This breaks everything down into assembly language, which is much closer to machine language for execution, and this is what governs how the code works.
Let’s understand the four parameters that the compile standard function uses to compile smart contracts in Python.
- language: obviously- Solidity as its the language used for the smart contract
- sources: refers to the smart contract file, and content which takes the variable used to store the contents of the smart contract file in Pyrhon on reading it above.
- outputSelection: Without going into too much detail here, I’ll let you know this is important to get the output informatino required, namely– ABI, Metadata, Bytecode and its sourcemap.
- solc_version: I have used 0.6.0 here because I used 0.6.0 in the smart contract. You may use a later version but this is the most stable version yet.
After compilation, open the file and dump it into a JSON-formatted file. This is the reason I imported JSON above.
compiled_sol = compile_standard(
    {
        "language": "Solidity",
        "sources": {"SimpleStorage.sol": {"content": simple_storage_file}},
        "settings": {
            "outputSelection": {
                "*": {
                    "*": ["abi", "metadata", "evm.bytecode", "evm.bytecode.sourceMap"]
                }
            }
        },
    },
    solc_version="0.6.0",
)

with open("compiled_code.json", "w") as file:
    json.dump(compiled_sol, file)
Step 4: Extracting the ABI and Bytecode from Solidity Smart Contracts in Python
It’s essential to know about ABIs and Bytecode in Solidity to understand how to interact with compiled smart contracts in Python.
Bytecode
Bytecode refers to the roasted meat of smart contracts. It contains the necessary information for code execution. It includes the key commands in assembly language that are executed at low-level or machine-level instead of the whole smart contract. In simple words, this is the code that is executed and which governs the working of the smart contract file.
Notice that the following code is in JSON format.
It’s also interesting if you browse to object, in the JSON directory of compiled contract file, to see that this is really low-level stuff.
# get bytecode
bytecode = compiled_sol["contracts"]["SimpleStorage.sol"]["SimpleStorage"]["evm"][
    "bytecode"
]["object"]
ABI: Application Binary Interface
Application Binary Interfaces are vital pieces of information for a smart contract.
What does it do, though? Why should you care?
ABI is quite similar to API (Application Programming Interface), a term I am sure you are familiar with and you probably thought of based on the similar initialism. ABI is responsible for the interaction between methods and structures in the smart contract.
If you print out the compiled JSON file, you will notice that the ABI includes the smart contract files’ inputs, names, and outputs– or the bare bones of it. Basically, it includes the stripped-down smart contract file with important information about a function’s inputs, name, outputs,r data types, etc.
# get abi
abi = json.loads(
    compiled_sol["contracts"]["SimpleStorage.sol"]["SimpleStorage"]["metadata"]
)["output"]["abi"]
Step 4: Connect using Ganache- Local Ethereum Blockchain to deploy Smart Contracts in Python
This is the part it starts to get real fun– or depressing, depending on who you ask. The truth lies somewhere in the middle, as with most things.
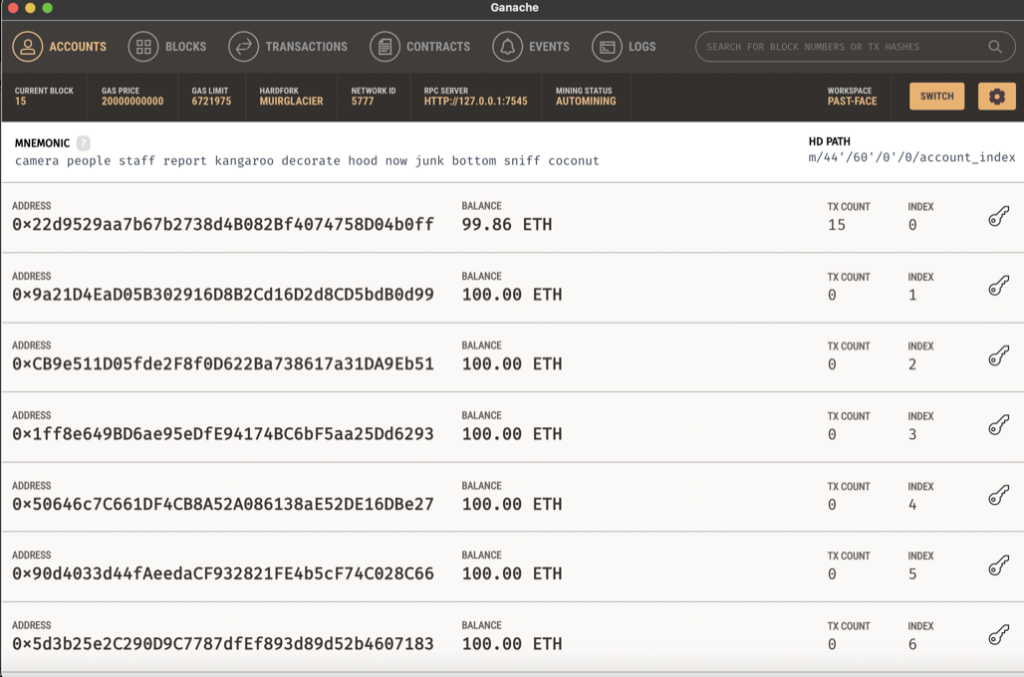
Okay, Web3 is used to connect with this local Ethereum blockchain on Ganache using the HTTP/RPC provider. But that’s not all! You also need the chain id, address of the blockchain, and its private key to sign the transactions. You can get all of this information from the following part of the screen on your Ganache app.

# set up connection
w3 = Web3(Web3.HTTPProvider("HTTP://127.0.0.1:7545"))
chain_id = 1337
my_address = "0x22d9529aa7b67b2738d4B082Bf4074758D04b0ff"
#private_key = os.getenv("PRIVATE_KEY")
private_key = "0xafb98d224dcc7768934bee92d8b6c330b06ff88a5e12b9cfb629bc30323b6547"
Remember to add a 0x before pasting the private key from Ganache, as Python looks for it when it parses. One peculiar thing for you might be the getenv function above instead of pasting the private key directly. This is because of security concerns. It’s good practice not to leave your private key in the code. Instead, create a new file–.env. In this file, write “PRIVATE_KEY=0x,” and after 0x, paste in the private key.
Ensure you don’t add any spaces whatsoever. However, I commented this line for simplicity and instead pasted the private key as a string in the source file.
Okay, that leaves writing the os dot getenv function and then writing the text on the left side of the assignment operator, that is, “PRIVATE_KEY.”
Note: Never share your private keys with anyone. This has been used only for developmental purposes so that I can share it with you, but if you hold any funds, please encrypt it.
Step 5: Transactions using Smart Contracts in Python
In this step, let’s learn to interact with smart contracts in Python. This is the main gravy so let’s get groovy. Haha, jokes aside, this is where it gets interesting, and you can do pretty much anything here with smart contracts in Python in terms of transactions.
Now that the basics are done, the first step to deploying the smart contracts in Python is to initialize the smart contract in Python.
Use the eth dot contract function and set in the ABI and bytecode parameters equal to the variable names that store them. It essentially creates or initializes the smart contract in Python. For this, it’s important to know about nonce. For our purposes, it’s an arbitrary number that can be used once in blockchain communication. Note that is different than the nonce that “answers’ a blockchain “problem.” This none tracks the number of transactions. Get it by using the getTransactionCount function on the address used above. It is 0 if there are no transactions at the address.
There are three more things to do after creating smart contracts in Python:
- Build the transaction: In web3.py, you always need to pass the parameters of chainid, address of sender, and a nonce. It’s best to pass these in as variables.
- Sign the transaction: This is where you will use your private key stored above to sign the transaction. Anyone else will be able to confirm who made the transaction, as a result. The parameters here are the transaction built and the private key.
- Send the transaction: This step uses the send_raw_transactions function which uses the signed transaction parameter.
To confirm the transaction was sent, wait for a transaction receipt.

Congratulations! You just sent your first transaction on a local blockchain!
# initialize contract
SimpleStorage = w3.eth.contract(abi=abi, bytecode=bytecode)
nonce = w3.eth.getTransactionCount(my_address)
# set up transaction from constructor which executes when firstly
transaction = SimpleStorage.constructor().buildTransaction(
    {"chainId": chain_id, "from": my_address, "nonce": nonce}
)
signed_tx = w3.eth.account.signTransaction(transaction, private_key=private_key)
tx_hash = w3.eth.account.send_raw_transaction(signed_tx.rawTransaction)
tx_receipt = w3.eth.wait_for_transaction_receipt(tx_hash)
Step 6: Deploying Smart Contracts in Python
In this step, you will finally deploy smart contracts in Python.
I know you have been waiting for this but all of the previous steps were necessary to get to the point of deploying smart contracts in Python.
To work with or interact with smart contracts in Python, you need ABI and address.
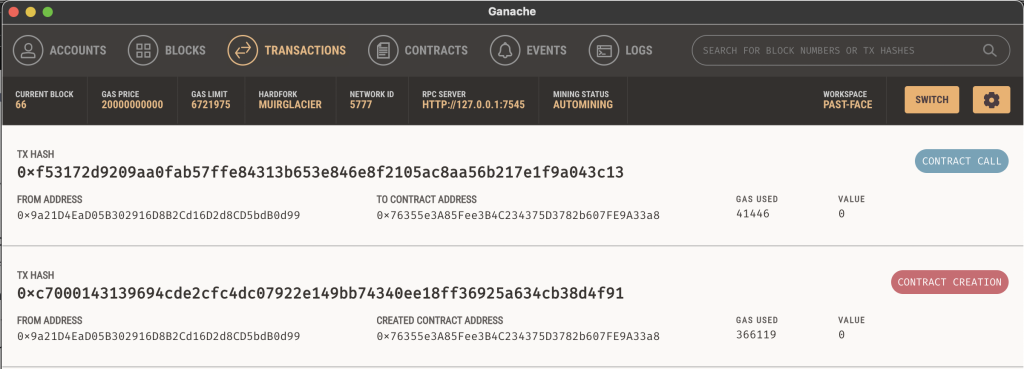
There are two different ways to interact with blockchains: call and transact.
Call refers to the functions in smart contracts that don’t make state changes or the view functions.
Transact refers to the function in smart contracts that do make state changes.
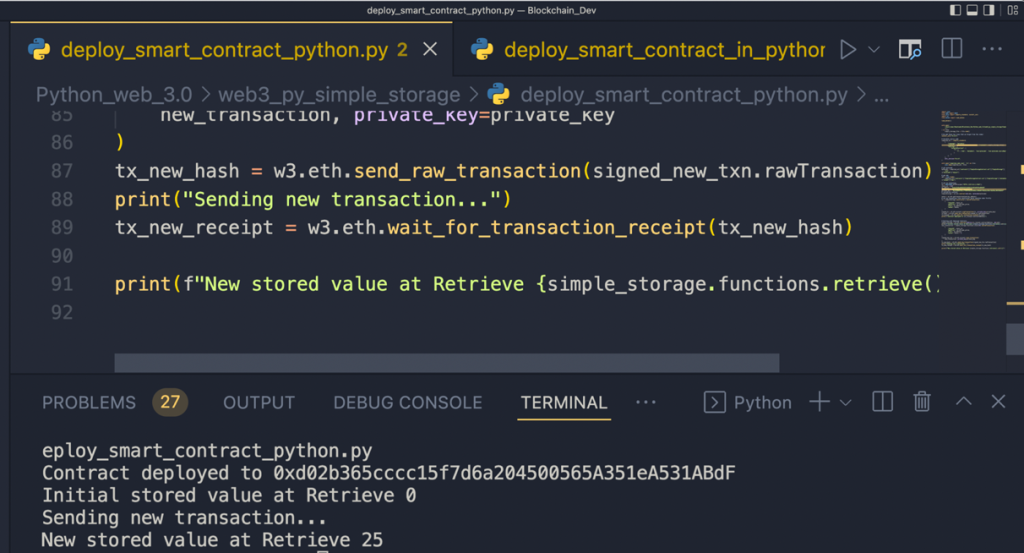
To make a state change, you must build a transaction and then sign and send it to make state changes. Once the store function has been “transacted,” call the retrieve function to fetch the value.
# calling functions in contract block
# to work with a contract, you need abi and address

storage_sol = w3.eth.contract(abi=abi, address=tx_receipt.contractAddress)
call_fun = storage_sol.functions.store(5).buildTransaction(
    {"chainId": chain_id, "from": my_address, "nonce": nonce + 1}
)
sign_call_fun = w3.eth.account.signTransaction(call_fun, private_key=private_key)
tx_call_fun_hash = w3.eth.send_raw_transaction(sign_call_fun.rawTransaction)
tx_call_fun_receipt = w3.eth.wait_for_transaction_receipt(tx_call_fun_hash)

print(storage_sol.functions.retrieve().call())
Bonus: Deploy Smart Contracts in Python using Infura
Note: To view the full Python source file, head to the Deploy Smart Contracts in Python Github Repository which includes all the source files, including the smart contract and the Python files to deploy locally and using Infura.
What is Infura?
Infura is a third-party Blockchain-as-a-Service (BaaS) platform that allows you access to their node network and gives a blockchain URL to deploy on the main net or test nets like Rinkeby. Moreover, using Infura means an easier way of testing your code on a blockchain, instead of an offline one. Infura is really intuitive and simple to use.
Another BaaS is Alchemy. However, I haven’t tried it myself.
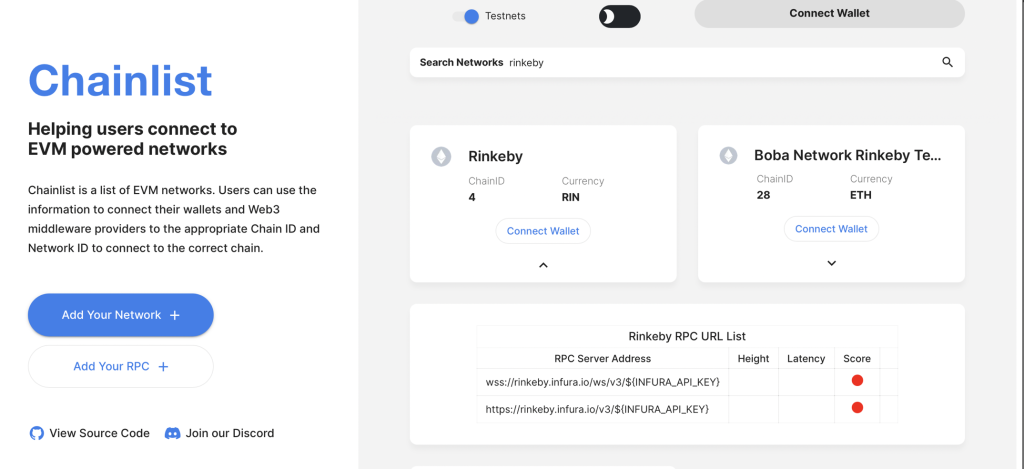
To find out the Chain IDs of different blockchains, head here.
After that, open your Metamask wallet and copy the wallet address to my address variable in the code. For the private key, head to account details and private key, enter your passcode, and copy the private key to the smart contract code in Python.
Everything else remains the same.
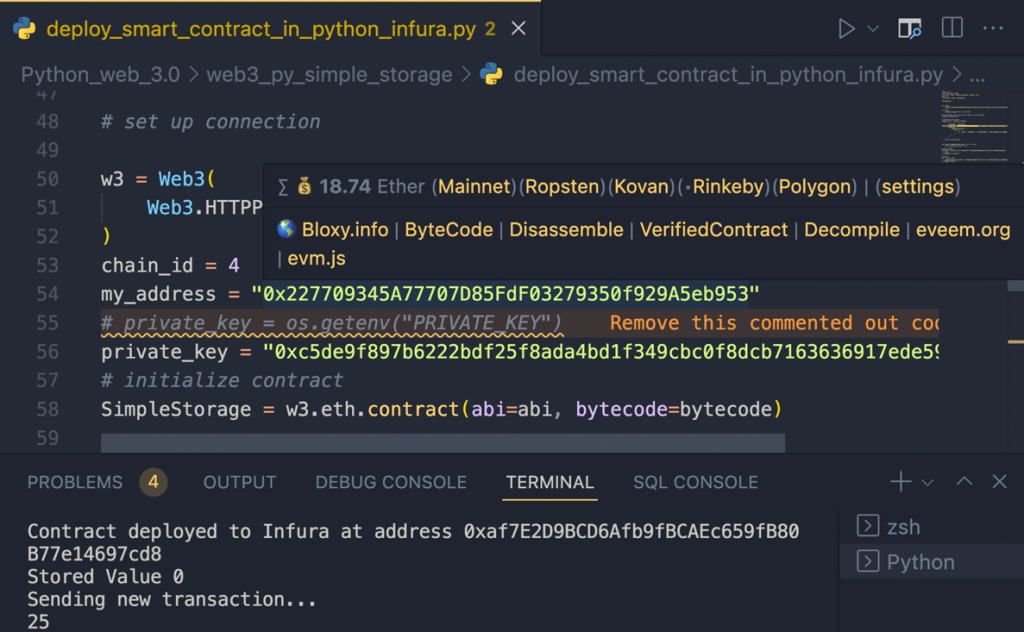
Sign up on Infura, create a new project and then under the “<strong>Keys</strong>” section, search for endpoints. Use the dropdown to select any test net server– I used Rinkeby. I have explained in depth the reason to work with Testnets at this point. Copy the Rinkeby endpoint URL and paste it inside the Web 3 HTTP Provider function
The following is the piece of code that must be updated to deploy smart contracts in Python on Infura:
Web3( Web3.HTTPProvider("https://rinkeby.infura.io/v3/222c8aa6fd6b4f77a4e9c410a094e3f8")
chain_id = 4
my_address = "0x227709345A77707D85FdF03279350f929A5eb953"
# private_key = os.getenv("PRIVATE_KEY")
private_key = "0xc5de9f897b6222bdf25f8ada4bd1f349cbc0f8dcb7163636917ede59ff97838d"
Conclusion
In conclusion, you deployed your smart contract files in Python locally and on a test net, like Rinkeby, using Infura. I hope following this tutorial was fun for you to follow along.
I love developing in Python, so that’s the route I use. However, you can do the same things in Javascript (JS), with some minor changes. Javascript possesses a Web3.js library for Web 3.0-related tasks. Furthermore, Python is also a language for deploying smart contracts n.
Solidity or Vyper both provide a decent-only package. Vyper resembles Python syntax, while Solidiry follows Javascript and a little bit of C++. Access all source code files on this Github repo.
I hope you found this post to be informative and that it was easy to follow. But if you face any issues or problems, let me know below. Don’t forget to like the article if you learned anything useful here.


6 replies on “Smart Contracts in Python: Complete Guide”
I have a problem
my smart contract has an import other contract
a.sol import b.sol
these are in the same folder
but when I compile it , I get an error:
{"errors":[{"component":"general","errorCode":"6275","formattedMessage":"ParserError: Source \"SafeERC20.sol\" not found: File outside of allowed directories.\n -->Hi, Hamid. From what I understand of the problem you face in python smart contracts code is an import error. Did you try this to fix the python smart contract error? When you import something in the same directory, you should start with “./” so basically do “./bxyz” instead of just the name because then it treats it as an absolute path which won’t work. Hope it helps. Let me know if solved the smart contracts python error, thanks.
This is my py file:
import jsonfrom solcx import compile_standard, install_solc
import os
install_solc("0.8.0")
with open('./SC.sol', 'r') as smartContract:
currentSC = smartContract.read()
compiled_sol = compile_standard(
{
"language": "Solidity",
"sources": {"SC.sol": {"content": currentSC}},
"settings": {
"outputSelection": {
"*": {"*": ["abi", "metadata", "evm.bytecode", "evm.sourceMap"]}
},
},
},
solc_version="0.8.0",
)
print(compiled_sol)
———-
this is my SC.sol :
pragma solidity ^0.8.0;import "./SafeERC20.sol";
contract ChildContract {
address private owner;
address private mainContractAddress;
using SafeERC20 for IERC20;
constructor(address _owner) {
owner = _owner;
mainContractAddress = msg.sender;
}
modifier onlyOwner() {
require( msg.sender == mainContractAddress || msg.sender == owner , "Access denied!" );
_;
}
.....
—–
and this is my SafeErc20.sol:
pragma solidity ^0.8.0;import "./IERC20.sol";
import "./Address.sol";
/**
* @title SafeERC20
* @dev Wrappers around ERC20 operations that throw on failure (when the token
* contract returns false). Tokens that return no value (and instead revert or
* throw on failure) are also supported, non-reverting calls are assumed to be
* successful.
* To use this library you can add a `using SafeERC20 for IERC20;` statement to your contract,
* which allows you to call the safe operations as `token.safeTransfer(...)`, etc.
*/
library SafeERC20 {
using Address for addr
...
are are same directory, but still I have that error message 🙁
In that case if it still didn’t fix your python smart contract issue, I think entering the full path might help you.
I solved this problem and made an article in medium, maybe help someone else.
https://athamidn.medium.com/deploy-multi-file-smart-contracts-with-python-798a5d7cfa13
I am glad to hear that.