Authentication in Python: Biometric Fingerprint Matching
Before looking at biometric authentication in python with fingerprint matching, I want to explain the concept behind it. Why do you need an authentication system? Why should you build it without weaknesses? I’ll answer that and more with a basic program in python. Then, I’ll explore what authentication in python means with face recognition and fingerprint matching.
So, let’s start this exciting post by discussing what cybersecurity looks like in 2022.
Cybersecurity in 2022
Cybersecurity refers to the protection of your digitally connected systems. What is the reason for the issues we face? Security vulnerabilities. But what are security vulnerabilities?
Security Vulnerabilities
These are the weak points in our systems that can be exploited. Usually, this is done by hackers. Sometimes, maliciously, but not always. But contrary to popular opinion, a group of “white hat” or “ethical” hackers help people. How? They exploit the security vulnerabilities in the system, too, like other hackers.
The difference, however, lies in the goal. White hat hackers exploit the system to identify security vulnerabilities they can help fix. They don’t have malicious intent. They don’t want to “harm” the system but help improve the weaknesses.
Password Authentication in Python
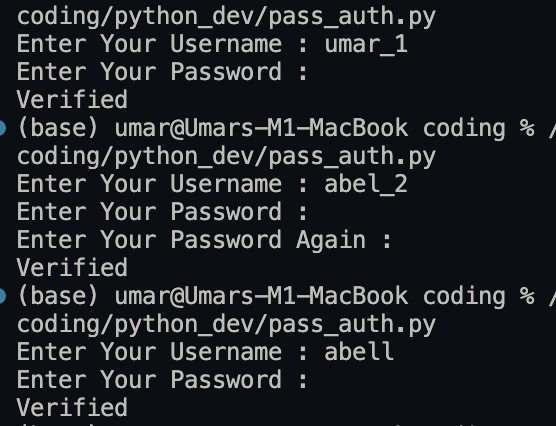
Before diving into more intricate stuff, I want to explain the need of an authentication system with a simple program. This code serves user verification. It focuses on basic password authentication. First, you need to import a library: getpass.
import getpassAfter import, you need to create a dictionary in python and pass key-value pairs of username and passwords. This acts like your database on a low-level… for the sake of this example. This is by no means a practical or effective password authentication system. After creating a dictionary, an input is asked from a user. If the user enters a valid username, one from the key values above, and the valid password, the program prints “User Verified”.
The getpass() method prompts the user for password input without echoing, that is, the characters are not shown on the screen. get() fetches the value for a key in the dict.
The program works in this way:
- user enters a username
- then, the user enters a password
- if the password matches the value in dictionary, print “User Verified”
- otherwise, re-prompt the user for password
A flaw of this program, among other issues, is that if the user enters a username out of this dictionary, the program still works. As long as a valid password is entered. Hence, it is a crucial security flaw. You don’t want an intruder to access a user’s data. So, authentication is the cornerstone of security.
I will write a future post on more intricate uses of authentication in python. And in that post, I will discuss hashing, salt, pepper, 2FA, and more. These are the things used today in modern system for high security.
database = {"umar_1": "sesamedisk", "abel_2": "nihaocloud"}
username = input("Enter Your Username : ")
password = getpass.getpass("Enter Your Password : ")
for key in database.keys():
    if username == key:
        while password != database.get(key):
            password = getpass.getpass("Re-enter Your Password : ")
        break
print("User Verified")
Output:
The last output points out the glaring flaw in this basic system. A wrong username still works.
Cybersecurity Trends 2022
What are the cybersecurity trends in 2022? Well… for a few reasons. So, let’s look at a few top cybersecurity trends in 2022:
- 5G Vulnerabilities: 5G is a budding technology with a ton of potential. But… with potential come vulnerabilities. This offers much potential to explore in term of IoT and more.
- Ransomware attacks: Ransomware cybercrimes are growing to alarming numbers. These attacks refer to a hacker denying you access to your files and directories. You can have it back… if you pay them a certain amount.
- Using AI and automated hacking: AI has evolved at an exponential rate. Using AI, you can do great things. For instance, predict upcoming threats or attacks, find the best solutions, and react in real-time situations with artificial intelligence.
Biometric Authentication in Python
This is an incredible field to explore today with the recent strides in human identification and growing security concerns. Biometric authentication uses bodily features for identification. Using your fingerprint, face, or iris as passwords make them hard to hack. We can look at use cases like face recognition in python and fingerprint matching for authentication in python. I have already written an article on face recognition in python. Hence, I will focus on fingerprint matching in this post.
Algorithm for Fingerprint Matching in Python
There are eight steps in this fingerprint matching algorithm. I will explain each step with a relevant code snippet and its purpose. So, I hope the steps are clear and easy to follow. For your ease, I have also added the code on this Github repo. It’s the complete code to use, except that you’ll have to update the image paths. But keep reading to learn the steps of this algorithm.
Steps for Authentication in Python: Fingerprint Matching
1. Install the libraries
Importing the necessary libraries first is a responsible approach. It starts the program cleanly since you usually know which libraries to use for a program. Also, it keeps the imports organized and easy-to-read
import os
from aiohttp import Fingerprint
import cv2
aiohttp stands for Asynchronous HTTP Client/Server for asyncio in python. Cv2 refers to OpenCv2, useful for image manipulation, while OS is the library for accessing the user’s operating system for directories and files.
Library Installation:
Use these commands in your terminal to install these two libraries. You don’t need to install the OS library; it’s pre-installed.
Use the following command to install aiohttp:
$ pip install aiohttpUse the following command to install OpenCV:
$ pip install opencv-python2. Read a sample altered fingerprint image from the dataset
The first step is to import the necessary libraries. After that, you have to import the required dataset. Why? A dataset is crucial to providing sufficient real-world sample data to learn about the scope and efficiency of a program. So, I chose the SOCOFing dataset. Since our use case is about fingerprint matching, it is a relevant dataset.
SOCOFing dataset
SOCOFing dataset contains more than 6,000 fingerprint samples, ten fingerprints of all African-American people aged 18 or above. You can access it from Kaggle— an invaluable resource. If you don’t know what Kaggle is… it is a site with thousands of cool datasets you can get for free.
So, for example, you can access famous datasets like IMDB ratings, Spotify albums, World Inflation Dataset 1960-2021, and more.
Anyways, moving on to our fingerprint dataset. SOCOFing contains unique attributes for gender, hand, and finger name. In addition, altered fingerprint versions are provided with three levels of alteration: obliteration, central rotation, and z-cut. But note that not all fingerprints have synthetically altered versions.
Moreover, the file format consists of label for each image with a naming convention of:
“001_M_Left_little_finger_Obl.bmp”
To read the dataset, you need to use imread() from OpenCV.
sample = cv2.imread(
    "../SOCOFing/Altered/Altered-Hard/1__M_Right_index_finger_Obl.BMP"
)
3. Read the real fingerprint images
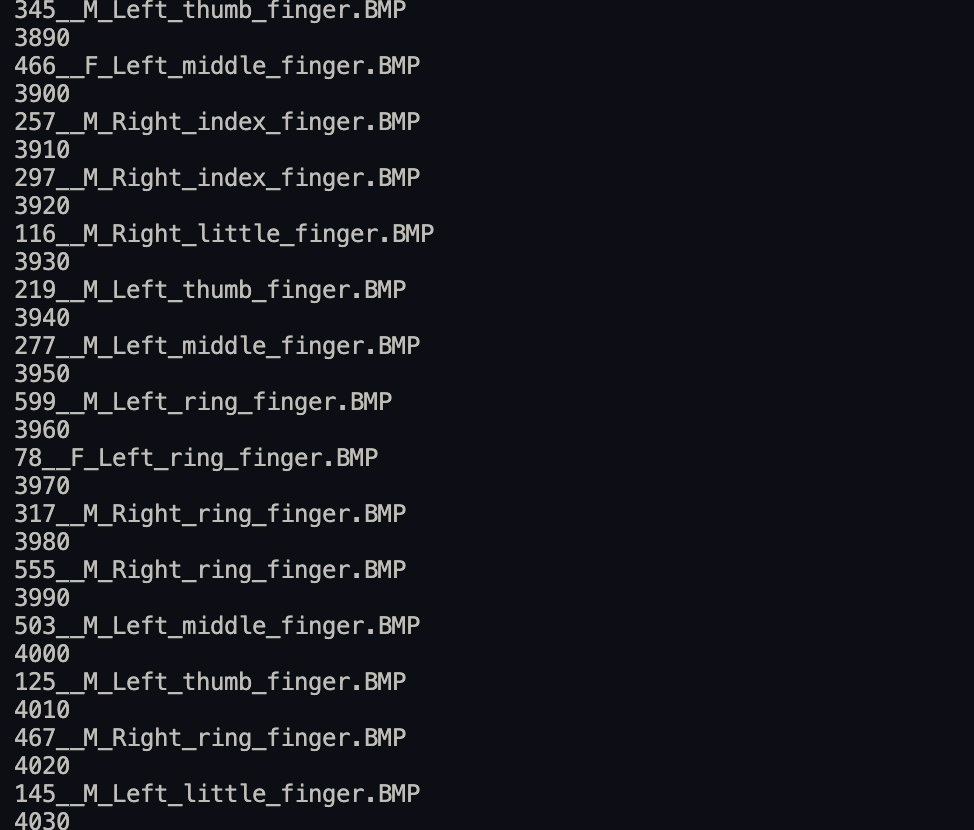
In this step, use os.listdir() to scroll through the “real” images in the fingerprint dataset. What does “real” mean here? Real images are the unaltered fingerprint images in the dataset.
I used a for loop to read through the real images in the dataset. So, the purpose is to eventually compare the sample altered image with real fingerprint images in the fingerprint image variable. Hence, it looks for a match among the real fingerprint images. Also, a counter shows the image number read every ten images. This is purely to know the number of the image currently read.
best_score = counter = 0
filename = image = kp1 = kp2 = mp = None
    for file in os.listdir (SOCOFing/Real"):
    if counter % 10 == 0:
        print(counter)
        print(file)
    counter += 1

    fingerprint_img = cv2.imread(
        "SOCOFing/Real/" + file
    )
4. Create a SIFT object; What is SIFT?
SIFT object is a Scale Invariant Feature Transform object. What does SIFT mean, though? In simple terms, it is a feature algorithm that finds the image keypoints. In this case, the SIFT object detects the ridges in the fingerprints.
According to the OpenCV docs, each keypoint is a special structure with many attributes like its (x,y) coordinates, size of the relevant neighborhood, the angle which specifies its orientation, and response that specifies the strength of keypoints, etc.
Now that you know the keypoints let’s discuss the benefits of using SIFT. Quite simply, SIFT features are scale and rotation invariant. How? Let’s see the steps for SIFT algorithm:
- Constructing a Scale Space: This ensures scale-independent features.
- Keypoint Localisation: This step identifies the suitable features or keypoints. Keypoints are selected based on a measure of stability. The idea is to find the local maxima and minima for the images.
- Orientation Assignment: This step ensures the keypoints are rotation invariant. How? By computing the best orientation(s) for each keypoint region.
- Keypoint Descriptor: In the end, SIFT assigns a unique fingerprint (no pun intended) to each keypoint.
sift = (
        cv2.SIFT_create()
    )
# extract key points from image; keypoints are particularly interesting or stand out; descriptors describe keypoints
5. Detect the keypoints & compute the descriptors
The SIFT object consists of a function that identifies and detects the descriptors and keypoints in any image. This is called detectAndCompute(). Pass two arguments: the image to read and None for keypoints as we want it to detect keypoints–not provide them. So, the keypoints and descriptors in both the fingerprint images (original and altered) are identified and computed. These features are scale and rotation invariant.
keypoints_1, des1 = sift.detectAndCompute(sample, None)
    keypoints_2, des2 = sift.detectAndCompute(fingerprint_img, None)
6. Find best match of distance between keypoints and descriptors
OpenCV contains tons of effective and efficient functions and libraries. One of these is the Flann Based Matcher. This matcher function performs a fast local approximate nearest neighbors (FLANN) calculation between two sets of feature vectors. The result is two NumPy arrays. The first one is a list of indexes of the matches, while the second one contains the values of match distances.
In this case, k=2 as we only compare two images at any time. Hence, it is a great function to speed up the process. An argument specifying the algorithm to use is passed as a dictionary. One specifies k-d trees, which organize points in k-dimensional space.
# fast library for KNN; approx best match
    matches = cv2.FlannBasedMatcher({"algorithm": 1, "trees": 10}, {}).knnMatch(
        des1, des2, k=2
7. Matching the keypoints for fingerprint authentication in python
Matching the keypoints is perhaps the most essential step of this algorithm. Here, first, define an array to hold the matched points. Then, compare the distance between the matched points. After that, use conditional statements to assign keypoints to the length of the larger one among the two sets of keypoints.
match_points = []
for p, q in matches:
if p.distance < 0.1 * q.distance:
match_points.append(p)
keypoints = 0
if len(keypoints_1) <= len(keypoints_2):
keypoints = len(keypoints_1)
else:
keypoints = len(keypoints_2)
if len(match_points) / keypoints * 100 > best_score:
best_score = len(match_points) / keypoints * 100
filename = file
image = fingerprint_img
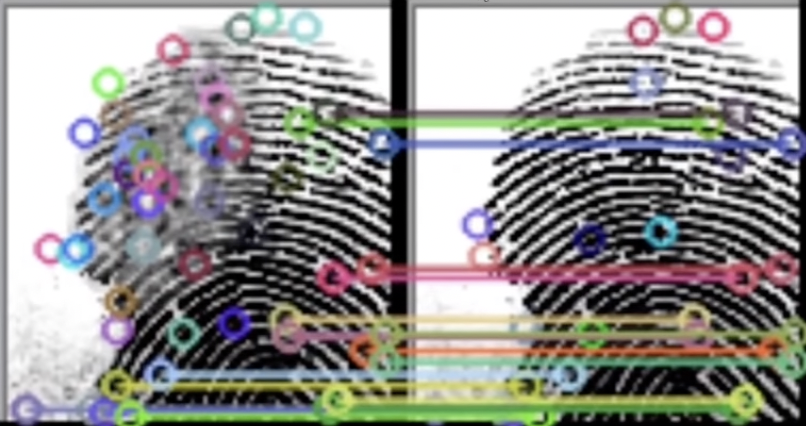
kp1, kp2, mp = keypoints_1, keypoints_2, match_points8. View the fingerprint with drawn match points and the best match and score
This is the last step for this algorithm. Here, I have printed the file name that results in the best match and the best score. Next, apply a condition that if the match points are greater than 0 to see if the images have been read, then draw the match points using the drawMatches() method in cv2. After that, use imshow() to display the resultant image. The next two lines ensure the image window doesn’t close instantly.
print("Best match:  " + filename)
print("Best score:  " + str(best_score))

if len(match_points) > 0:
    result = cv2.drawMatches(sample, kp1, image, kp2, mp, None)
    result = cv2.resize(result, None, fx=4, fy=4)
    cv2.imshow("Result", result)
    cv2.waitKey(0)
    cv2.destroyAllWindows()
There you have it. You just learned to match fingerprints! Get a job in CSI or stuff, haha. You can easily match a fingerprint with the fingerprints in a database now. Pretty cool, right?
Results: Authentication in Python with Fingerprint Matching
Okay, now that the algorithm is complete, I will share the results below.
Here is how it looks as it runs, before completion:
What is a good score? I consider any score greater than 50 to be an acceptable best score. Below are a few best matches and scores:


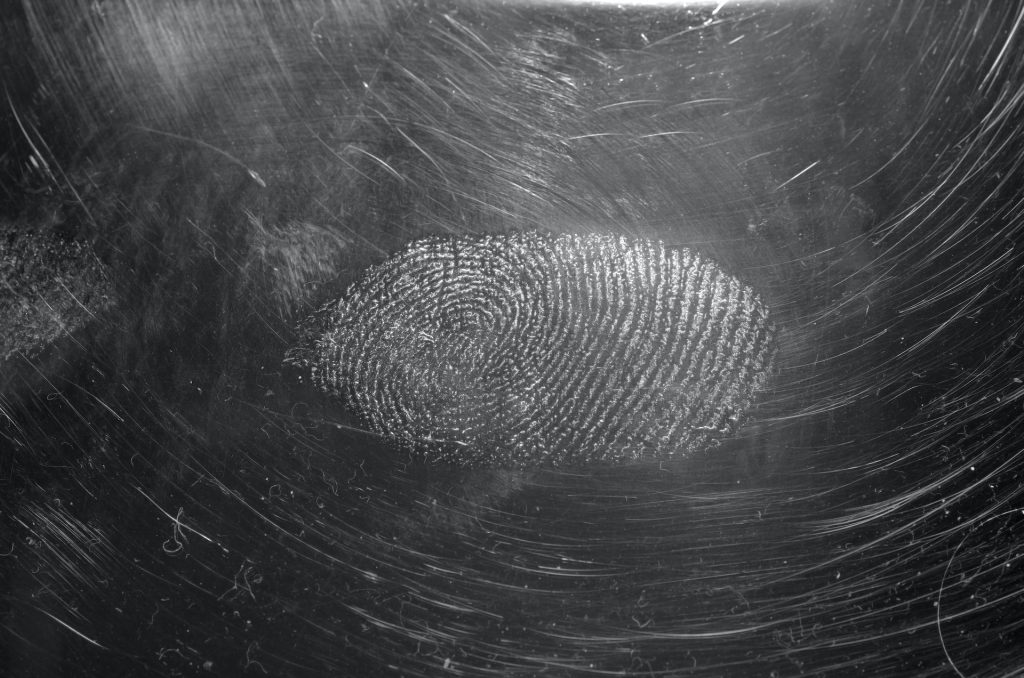
This is a fingerprint with drawn matched points between the real and altered images:
Conclusion: Authentication in Python
In conclusion, authentication in Python is a huge topic today. It is vital to learn the skill to protect yourself and be a core asset to any company in the age of web 2. Hence, you will ensure you get employed or can start your own business. Why? Because you know the risks you need to tackle in cybersecurity and the trends to follow.
Authentication in python is a relevant topic to learn today. Applications that use biometric authentication are growing in popularity. So, it’s a great time to dive in. It includes use cases like face recognition and fingerprint matching.
I hope you liked this post and that it was easy to follow. But if you face any issues or problems, let me know below. Even if you don’t, I would love to hear your feedback and experiences. Don’t forget to like the article if you learned anything. Also, share with your friends if you think it might help them.
If you liked this post, you might want to read similar tutorial posts. basic User login authentication in python, Face Recognition in Python and Deploying Smart Contracts in Python.
Have a great day! Take care!
Written by: Syed Umar Bukhari.