Colossal AI: A Deep Dive into the Open-Source Chatbot Framework
In a digital revolution, chatbots have ascended the throne, reshaping the landscape of human-machine communication. Yet, it’s the unprecedented rise of revolutionary AI chatbots like ChatGPT, and the pioneering Colossal AI, that has ignited an insatiable global demand. Thus, they are now utilized everywhere — from customer support to sales and yes, even hotlines. The coolest part? With the advent of advanced natural language processing, building a chatbot has turned from Mission Impossible into a walk in the park. Now, that’s what we call an upgrade!
We have already discussed ChatGPT in detail before, so in this article, we’re going to dive right into the nitty-gritty of how to create a badass chatbot using the Colossal AI framework. No jargon, no fluff, just good ol’ practical know-how. So grab a cup of coffee, sit back, and get ready for a wild ride into the exhilarating world of chatbots.
What is the Colossal AI Framework for Chatbots?
As an innovative open-source platform, Colossal AI is redefining how engaging and adaptive conversational platforms are created, paving the way for interaction that feels incredibly natural and intuitive. But what does this mean for you, the developer? With Colossal AI at your fingertips, you’re offered a platform that is as flexible as it is scalable, leveraging advanced Natural Language Processing (NLP) techniques. This means more adaptability and less hassle, giving you the freedom to focus on crafting the perfect user experience.
But where Colossal AI truly shines is its status as a premier open-source solution for handling large AI models. It proudly wears the badge of being the first system to introduce a comprehensive end-to-end RLHF pipeline. RLHF is an acronym that stands for “Reinforcement Learning from Human Feedback” and specifically focuses on adding human feedback into the learning process. The RLHF pipeline includes supervised data collection, fine-tuning, and reinforcement learning fine-tuning. These exciting features build upon the LLaMA pre-trained model and signify a breakthrough in AI training and learning!
Colossal AI’s architecture consists of several components that work together to process user inputs, generate contextual responses, and manage the chatbot’s state. These components include Input Processing, Language Model, Context Management, and Response Generation.
Additionally, Colossal AI also presents Colossal Chat, aiming to mirror ChatGPT‘s technical approach.
Why Use Colossal AI for Chatbots
Here are a few advantages of using the Colossal AI for chatbots:
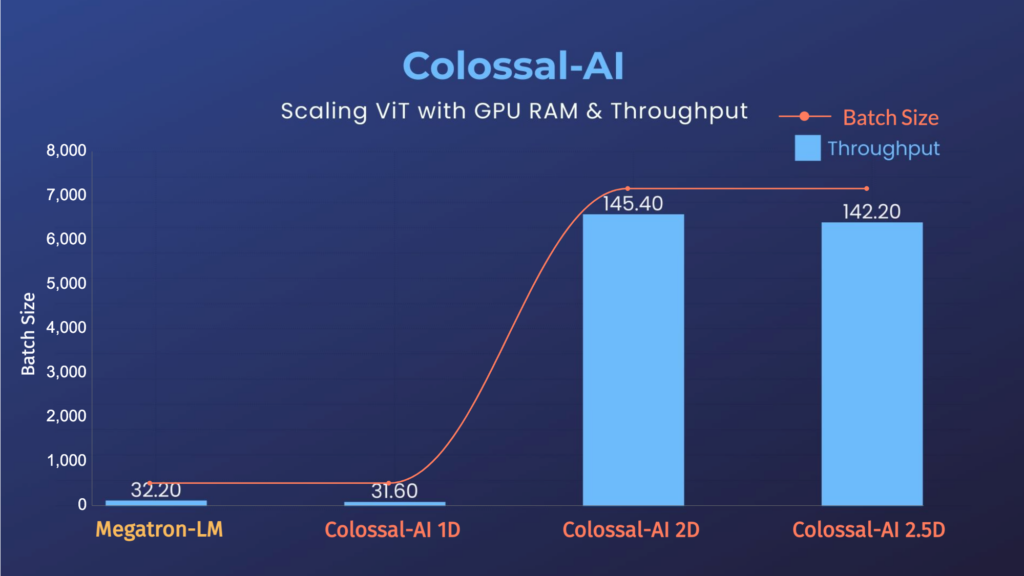
- Scalability: Colossal AI can handle large-scale deployments. It can scale to allow larger loads without degrading performance or response times.
- Flexibility: The framework supports various NLP models and allows developers to customize their chatbots according to their needs.
- Extensibility: Colossal AI offers a modular design. It enables developers to add or replace components as needed to improve the overall functionality of chatbots.
- Open-Source: As an open-source project, Colossal AI benefits from a global community of developers. They contribute to its continuous improvement and expansion.
This image below from their GitHub repo highlights the importance of GPU RAM & Throughput:
How to Install and Set Up Colossal AI Locally?
Follow these steps to install and set up Colossal AI locally:
Prerequisite: Ensure you have Python 3.6 or higher installed on your system.
Assuming you already have Python 3.6 or higher, we can begin the local installation of Colossal.
- Firstly, install the required package using pip using this command:
pip install colossalai- Then, create a new Python script and import these necessary modules to build an AI chatbot. Copy the lines below to import these packages to your script:
import colossalai
from colossalai import Chatbot- Configure the AI chatbot by specifying the desired NLP model and other settings as follows. Make sure to tune as necessary. For example, you could use another model instead of gpt-2. And the path depends on where you store that model.
config = {
    'model': 'gpt-2',
    'tokenizer': 'gpt-2',
    'model_path': 'path/to/pretrained/model',
    'max_context_length': 100
}- After that, instantiate the chatbot with the config using this command:
chatbot = Chatbot(config)- Now, use the chatbot to process user inputs and generate responses, like below:
user_input = "What is the weather like today?"
response = chatbot.generate_response(user_input)
print(response)
This is just a simple example. There’s so much more you can do to test. So, get your creative juices flowing. To further customize your chatbot, explore the Colossal AI documentation.
Building a Chatbot with Colossal AI Framework
Let’s focus on the required steps for building a chatbot using the Colossal AI framework. For the purposes of this article, we will build a news chatbot.
Requirements for Colossal AI Chatbot
The necessary requirements for the Colossal AI chatbot setup include:
- PyTorch version 1.11 or higher (with support for PyTorch 2.x in development)
- Python version 3.7 or higher
- CUDA version 11.0 or higher
- An NVIDIA GPU with a compute capability of 7.0 or higher, such as V100 or RTX20 series
- Python libraries, including Beautiful Soup, Requests, NLTK
Designing and Deploying an AI Chatbot
Decide on the platform where you want to deploy your chatbot, such as a website, messaging app, or social media platform. Also, consider the target audience and the platform’s requirements when designing the interface.
Gather Training Data For News Chatbot
A crucial step in building an AI chatbot is the collection of data for training purposes using APIs or web scraping tools. For a news chatbot, you may gather data from news websites, RSS feeds, or other relevant sources. This step requires web scraping libraries in Python, like Beautiful Soup and Requests.
To install Beautiful Soup, enter the following command:
pip install beautifulsoup4After that, to install the Requests library, use the following command:
pip install requestsThese commands will download and install the Beautiful Soup and Requests libraries for you to use in your Python projects.
import requests
from bs4 import BeautifulSoup
url = "https://www.bbc.com/news"
response = requests.get(url)
soup = BeautifulSoup(response.text, 'html.parser')
# BBC News uses <h3> tags with the class 'gs-c-promo-heading__title' for headlines
headlines = soup.find_all('h3', class_='gs-c-promo-heading__title')
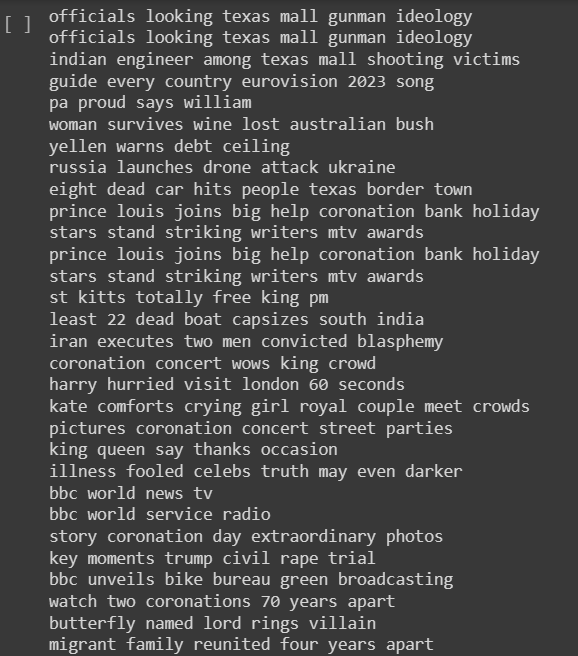
for headline in headlines:
print(headline.text.strip())The code above will print the headlines from BBC News. Here is the output:

Data Preprocessing: Clean, Transform, and Prepare Data for Training of Chatbot
Once we have fetched the data after scraping BBC News, we must clean and preprocess the collected data to prepare it for training. You can do this by tokenizing the text, removing stop words, and performing necessary preprocessing steps like data normalization and data integration. This step uses the NLTK library in Python.
pip install nltkThis command will download and install the NLTK library. NLTK is a popular library for natural language processing (NLP) tasks and provides a wide range of functionalities and resources for text analysis and NLP research. After installation, you can use the code below to perform data preprocessing.
import nltk
from nltk.corpus import stopwords
from nltk.tokenize import word_tokenize


# Download required NLTK resources
nltk.download("punkt")
nltk.download("stopwords")


# Define stop words
stop_words = set(stopwords.words("english"))


# Define the preprocessing function
def preprocess_text(text):
    tokens = word_tokenize(text)
    tokens = [token.lower() for token in tokens if token.isalnum()]
    tokens = [token for token in tokens if token not in stop_words]
    return " ".join(tokens)


# Scrape headlines from BBC News
url = "https://www.bbc.com/news"
response = requests.get(url)
soup = BeautifulSoup(response.text, 'html.parser')
headlines = soup.find_all('h3', class_='gs-c-promo-heading__title')


# Preprocess the headlines
preprocessed_data = [preprocess_text(headline.text) for headline in headlines]


# Print the preprocessed headlines
for preprocessed_headline in preprocessed_data:
    print(preprocessed_headline)
Here is the output:
Training and Optimizing the AI Model For News Chatbot
Great! Once the data has been cleaned and preprocessed, it’s time to train and optimize the Colossal AI model for the news chatbot. The code below helps you fine-tune your AI model on the training data.
from colossalai import FineTuner

config = {
    "model": "gpt-2",
    "tokenizer": "gpt-2",
    "model_path": "Insert the model path here",
    "max_context_length": 100,
}

fine_tuner = FineTuner(config)
fine_tuner.train(preprocessed_data, epochs=5, batch_size=32, learning_rate=1e-4)
fine_tuner.save_model("Model path here")
This code uses the Colossal AI library to fine-tune a GPT-2 model on preprocessed data. The configuration dictionary specifies the model, tokenizer, and pre-trained model path. Along with this it also specifies the maximum input sequence length. Then, it’s trained on the preprocessed data for 5 epochs with a batch size of 32. Once the training is complete, the fine-tuned model is saved to a specified path.
Deploying the Colossal AI Chatbot using Flask
Finally, we can integrate the chatbot with the chosen platform using APIs, or other relevant methods. It’s essential to ensure proper authentication, and data privacy measures are in place to protect user information. We must also monitor the chatbot’s performance, and gather user feedback to improve its performance. And this allows us to make necessary updates to the model and interface to improve the chatbot’s accuracy and user experiences.
Use this command to install Flask in Python:
pip install FlaskAfter that, let’s deploy the AI based news chatbot using Flask to create a web app.
from flask import Flask, request, jsonify
from colossalai import Chatbot


app = Flask(__name__)
chatbot = Chatbot(config)


@app.route("/chatbot", methods=["POST"])
def handle_request():
    user_input = request.json["message"]
    response = chatbot.generate_response(user_input)
    return jsonify({"response": response})


if __name__ == "__main__":
    app.run()
The code creates a web application using the Flask framework. It serves as an interface for a chatbot powered by the Colossal AI library. Basically, it sets up a route named “/chatbot” that accepts POST requests for users to interact with the chatbot.
When the server receives a message, it processes the user’s input and generates a response from the chatbot. As a result, it returns the response as a JSON object. The application listens for incoming requests and handles them. As such, it provides a simple way for users to communicate with the AI chatbot.
And there you have it! We have successfully implemented a news chatbot using the Colossal AI framework.
Note: Please consult the official documentation and relevant platform APIs for more detailed information.
Conclusion: The Scope of Colossal AI
Colossal AI is a powerful open-source chatbot framework. It offers a wide range of features and such platforms will contribute to the growth of AI. Also, it continues to empower users to push the boundaries of what is possible in the realm of AI.
To recap, initially, in this article we carried out the data collection and the preprocessing process. For this, we implemented web scraping, where we used one of the popular Python libraries, Beautiful Soup. Then, we installed the Colossal AI library and imported the chatbot library. After that, we trained and optimized the model using a fine tuner. Finally, we used the Flask framework for deploying the AI chatbot on a web app.
Similar articles: ChatGPT API: Automate Content Generation with Python and ChatGPT AI: Features to 6X Your Productivity in 2023.
Please share your thoughts in the comments and if you have any relevant queries.
Edited by: Syed Umar Bukhari.