Face Recognition in Python: A Beginner’s Guide will be an utterly fascinating post about something that is both scary and amazing– face detection and analysis using artificial intelligence in Python. How cool is that? How terrifying is that?
Before getting into it, I think it’s important to lay some ground framework. I’ll list a few prerequisites to follow along for best results as well as explain the underlying concepts behind face recognition and the difference between face recognition and face detection in Python. In the end, I will explore the deepface library in Python for some awesome applications.
I have uploaded all the code files on this Github repository for everything on this post about face recognition in Python. So, I will upload everything to the repo for you to use.
If you want to use Git:
git clone https://github.com/Sesame-Disk/face-recognition-python.gitPrerequisites:
- Python 3+ version
- VS Code, Pycharm, Google Colab, etc.
- (Clean) Dataset of images
- Some knowledge of coding
Face Detection in Python: How to Start?
Before getting into the coding part of this tutorial, I think it’s important to discuss some critical elements of face detection in Python. The most fundamental aspect of face detection in Python is understanding face encodings. But even before that, know that images are stored as arrays or matrices.
What does face recognition and face detection work on in Python? An algorithm notes certain essential elements on a face— color of eyes, the slant of the nose, the shape of the chin, and other apt things that help discern a face. Then, this information obtained identifies a particular face. “Face encodings” also help make this identification.
But what are face encodings? Let’s find out.
Face encodings are basically a way to represent the face using a set of 128 computer-generated measurements. Two different pictures of the same person have similar encoding, and two other people have totally different encoding, which helps distinguish people.
Face Detection in Python vs. Face Recognition in Python?
Wait– I’m lost. Aren’t both of them the same?
No. You see, face detection in Python slightly varies from what face recognition is in Python.
Face detection refers to identifying distinguishable facial features… application is also an auto-focus box.
On the other hand, face recognition refers to using the rules and protocols of face detection in Python to “recognize” faces by comparing their facial encodings to a database of stored images that it compiles or stores during face detection. Simply, face recognition in Python goes beyond face detection, which is its first application before it uses that information to compare it to stored data from images and recognize or identify the person in the digital image or video.
In other terms, face detection is an umbrella term in Python that has many more applications than simply face recognition, which serves to recognize human faces.
OpenCV
What is OpenCV? Well, it stands for Open-Source Computer Vision. In simple terms, it’s a library of functions aimed at image manipulations, image processing, and real-time computer vision.
As we discussed above, face detection is not a simple task. In fact, there are thousands upon thousands of “tasks” or features to identify and distinguish a face. These are known as “classifiers.” These classifiers are trained with a few hundred samples of an object and random samples– positive and negative examples, respectively. The output is “1” if the region is likely to contain that object (or face) and “0” if not.
These classifiers are then combined and applied subsequently to form “cascades.” The cascades break down the problem into 50 or 100 issues instead of thousands; one more essential thing is it works only if all cascades return a positive output.
In addition, OpenCV offers Haar Cascade and Single Shot Multibox Detector (SSD). SSD is a better detector.
Libraries to import/install as prerequisites:
Importing (after installing) is valuable, and it’s a good practice to import all necessary libraries before starting.
- face_recognition
- NumPy
- OpenCV
- os
- DateTime
A Beginner’s Guide: Face Recognition in Python:
I’ll break the code into different sections for easy understanding. In addition, it will help you see that while this code may look quite lengthy and intimidating, it is not hard to understand or code it in Python
Installing Face Recognition Module in Python
Installation on Mac & Linux:
First, make sure you have CMake installed:
brew install cmake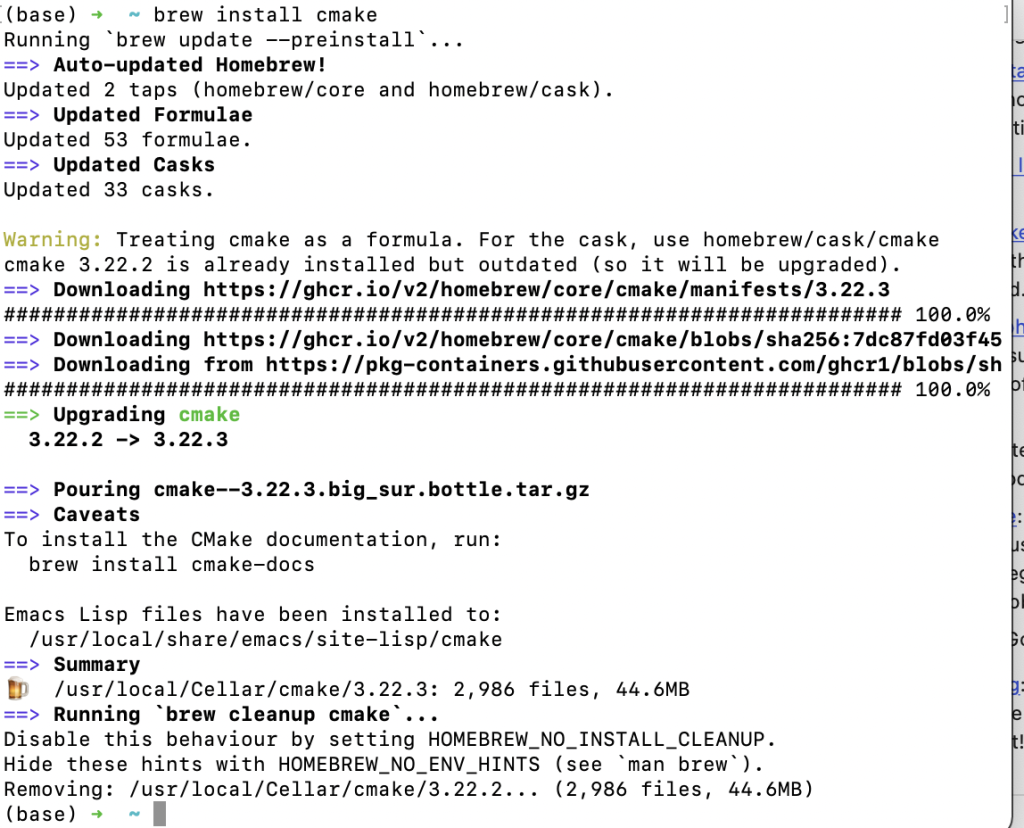
This is because you may get an error otherwise: “Make sure CMake is installed before installing Dlib”
Then, make sure you have Dlib already installed with Python bindings:
git clone https://github.com/davisking/dlib.git
cd dlib
mkdir build; cd build; cmake ..; cmake --build .
cd ..
python3 setup.py install
or
brew install dlib
pip install dlib
Finally, install face recognition library in python:
pip install face_recognitionIf you are having trouble with installation, you can also try a pre-configured VM.
1) Import Necessary Libraries in Python
import cv2
import NumPy as np
import face_recognition
import os
from DateTime import DateTime
2) Setting up Images path For loading all images:
This code section in Python is to declare a variable for the path to the folder with the images. Then, a list variable is used — it is empty at the beginning as no photos are added yet. Create another list variable for the image names– these are the names we will use later to show by the rectangle box on the person.
After that, loop through the directory of the path (using os module and listdir) to extract useful information for the images in the folder or path. This is done by using the “imread” function of OpenCV (written as cv2 in python code). imread only requires the path of the image.
Then, append the current image path to the list with the image paths. Similarly, for image names, use the append function and the split text function to extract only the name of an image without its extension.
# create path for images and name extraction

path = "/Users/umar/Downloads/6thSem/AI_Lab/images/"
images = []
names = []
myList = os.listdir(path)
print(myList)

# find the name of the person from image name and add images to a list

for imgNames in myList:
    curImg = cv2.imread(f"{path}/{imgNames}")
    images.append(curImg)
    names.append(os.path.splitext(imgNames)[0])
3) Finding the Face Encodings
This is the “science behind face recognition.” This function aims to find the face encodings of each image in the dataset or images folder mentioned in the path above. You must create another list variable here to store the facial encodings of each image– instead of manually storing them in new variables.
An important note here is that the face recognition module or library in Python works with RGB images, not BGR images. Therefore, cv2 or OpenCV converts the image with the function “cv2Color” into an RGB image that can be used.
Now, an image in RGB colors can find the face encodings. Lastly, the face encodings append the empty list which then stores them for future use. This leads to a storage of a sequence of encodings in the list.
This process is done in a loop, as long as there is an image path in the images list.
# find the face encodings of the images

def findEncodings(images):
    encodedlist = []
    for img in images:
        img = cv2.cvtColor(img, cv2.COLOR_BGR2RGB)
        encode = fr.face_encodings(img)[0]
        encodedlist.append(encode)
    return encodedlist
Call the definition to find the encodings for all images in the dataset.
This piece of code is responsible for ensuring the function definition above executes. It can be represented to the user by printing a message that says encoding is completed. This creates encodings for all images in the dataset.
encodeListKnown = findEncodings(images)
print("Encoding Complete")
4) Use Video Camera to capture images/faces
The code below is an easy way to turn on your webcam and capture live video using OpenCV or cv2 for face recognition in python. When you grant a resource to a module, you must also relinquish that control for security, privacy, and memory management. Do this at the end, though, when everything completes.
cap = cv2.VideoCapture(0)

# open video capture and detect a face, find and compare its encodings by the distance, and if the distance is within the min range, show recognition

while True:
    _, webcam = cap.read()
    imgResized = cv2.resize(webcam, (0, 0), None, 0.25, 0.25)
    imgResized = cv2.cvtColor(imgResized, cv2.COLOR_BGR2RGB)
5) Face Locations and Face Distances after comparison
Finding the face locations is a crucial part of face recognition in Python. This will determine how good an AI application that works as a face recognition app in Python is. Remember the import line for NumPy above? Yeah, this is where it comes to play. So, there’s a function in NumPy that calculates the indices of the minimum value on the axis. Below, this will be useful to find a match.
I want to point out a couple of cool things here. I messed a lot with the face encodings and face locations functions in the face recognition library in Python. Here is what I found from the docs and my experimentation:
- face_encodings: a notable second argument is num_jitters which refers to the number of times the face is resampled while encoding to increase the accuracy. Another one is models; while optional, the docs recommend using “large” or “small,” but I was able to use other models as well. I recommend passing image 5, “hog.” It works on hog even though the docs don’t specify that.
- face_locations: takes three arguments, notably a NumPy array image, the number of times to upsample an image to find smaller faces, and the models– “hog” is less accurate but faster on CPUs, while “CNN” is a more precise deep-learning model. But the code crashed on using “CNN” when I tried it. I recommend passing image, 2, “hog” for this function.
 faceCurFrame = fr.face_locations(imgResized)
    encodeFaceCurFrame = fr.face_encodings(imgResized, faceCurFrame)

    for encodeFace, faceLoc in zip(encodeFaceCurFrame, faceCurFrame):
        matches = fr.compare_faces(encodedListKnown, encodeFace)
        faceDis = fr.face_distance(encodedListKnown, encodeFace)

# argmin returns the indices of the minimum values along axis
        matchIndex = np.argmin(faceDis)
6) Compare Face Encoding Differences for Threshold
This is the last phase of our code for face recognition in Python. The key elements involved here are the following:
- compare and match: compare the distances between the faces. A match means the difference is below the threshold.
- the rectangle on face loc: the rectangle helps identify the face and if the app actually is able to distinguish faces from objects.
- customize rectangle: you can customise the color, size and locatino of the rectangle
- add a label for name: add a name to show on the rectange. Ideally, you want the person’s name to show.
# checks for match; if match found, shows name from the image name, and the face match percentage
        if matches[matchIndex]:
            name = names[matchIndex].upper()
            print(name)
            y1, x2, y2, x1 = faceLoc
            y1, x2, y2, x1 = y1 * 4, x2 * 4, y2 * 4, x1 * 4
            cv2.rectangle(webcam, (x1, y1), (x2, y2), (0, 255, 0), 2)
            cv2.rectangle(webcam, (x1, y2 - 35), (x2, y2), (0, 255, 0), cv2.FILLED)
            cv2.putText(
                webcam,
                name,
                (x1 + 6, y2 - 6),
                cv2.FONT_HERSHEY_COMPLEX,
                1,
                (255, 255, 255),
                1,
            )
7) Finding the Face Match Percentage
This portion is optional. If you are interested in printing out the fae match percentage for face recognition in Python, then use it. This prints the percentage of matching between the images compared with the tolerance level.
face_match_percentage = (1 - faceDis) * 100
            for i, face_distance in enumerate(faceDis):
                print(
                    "The test image has a distance of {:.2} from known image {} ".format(
                        face_distance, i
                    )
                )
                print(
                    "- comparing with a tolerance of 0.6 {}".format(face_distance < 0.6)
                )
                print(
                    "Face Match Percentage = ", np.round(face_match_percentage, 4)
                )  # upto 4 decimal places
8) Exit the Webcam and Loop with Escape sequence
This is the final step of this app. This will close the access that OpenCV was granted at the start so that it doesn’t continue to use the webcam. This prevents blocking of that resource for other apps and helps deal with security issues.
# allow exit from the webcam loop by escape sequence

    key = cv2.waitKey(30) & 0xFF
    if key == 27:
        break
    cv2.imshow("webcam", webcam)
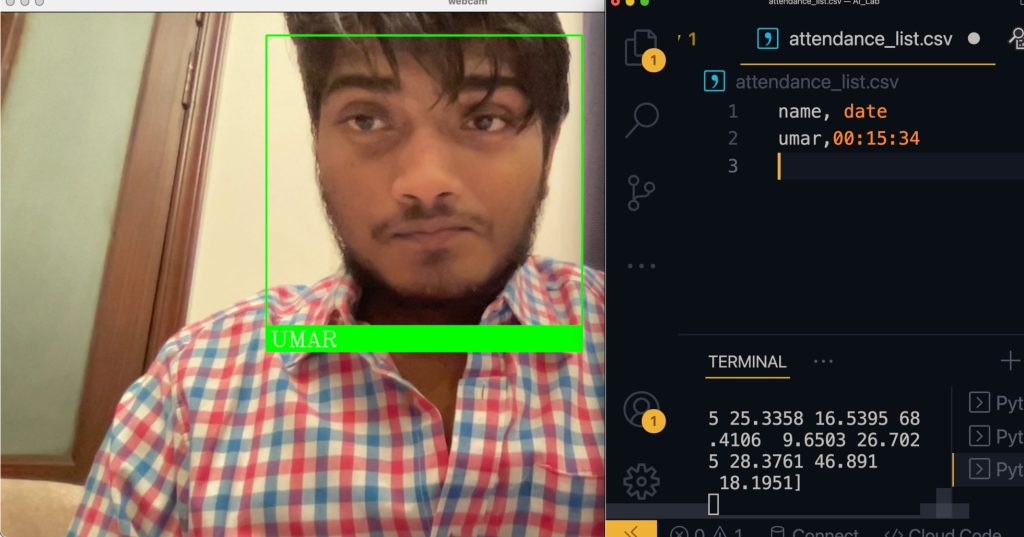
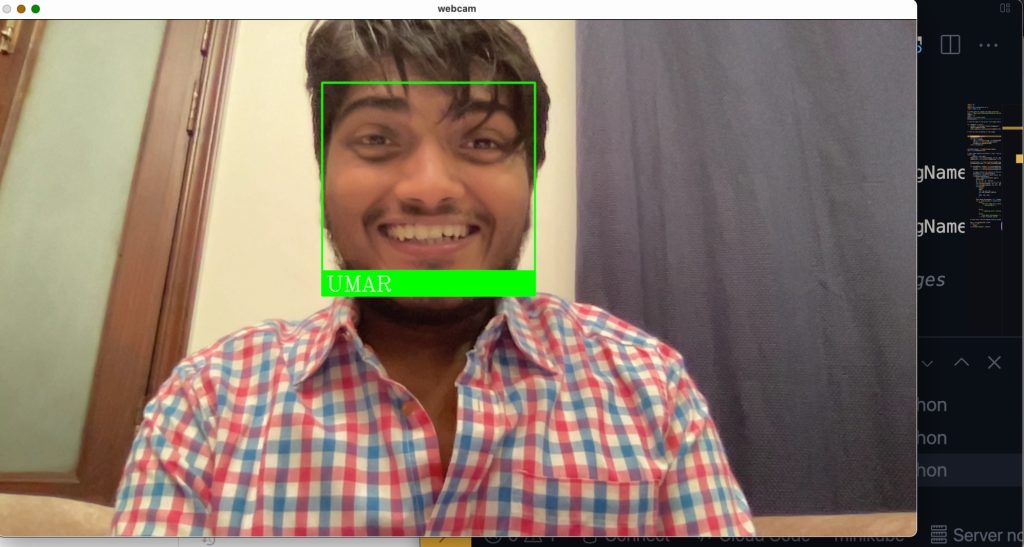
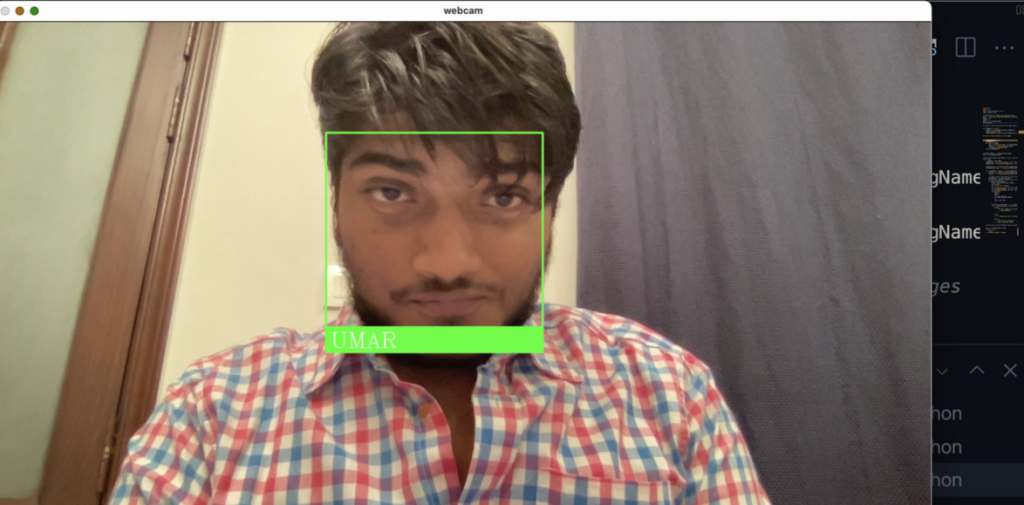
Output Screenshots:
Note that it recognizes the face in different emotions too.
Final Code
To view the final code for this project, go to this Github repo. We will be updating this section regularly for future content.
Congrats! You have gotten through so far. Did you enjoy coding the face recognition system in Python? I poured a lot of effort and experimented with the code repeatedly to find exciting things to share and ensure nothing went unnoticed.
The next section discusses some interesting applications of face recognition in Python, like face recognition analysis using another cool library which includes sentiment, age, sex, and ethnicity analysis.
Face Recognition Analysis in Python: Sentiment, Age, Sex & Ethnicity
Libraries to import/install as prerequisites:
- deepface
- matplotlib
- OpenCV
- OS
- pprint
Python Version
I’ll recommend using Python versions in the 3.7.x list to follow along with this project. Why? There are certain dependency issues for the deepface library in Python. It is cumbersome and frustrating because of an underlying TensorFlow version that doesn’t install nicely on the latest versions of Python (from my observation). For simplicity, I’ll assume you chose to use 3.7.x for this project to help make face recognition in Python run smoothly.
Creating a VirtualEnv
The simplest way to create multiple virtual environments and manage their usages is through Anaconda. Its Navigator makes it excessively easy to create a new Python virtual environment with a specified version.
Another helpful and easy way to create and manage virtual environments is PyEnv. PyEnv allows you a simple means to switch environments, change a global or project level environment, and even lets you search commands across multiple Python versions– simultaneously.
Choosing an IDE
For M1 Mac users, I really won’t recommend Jupyter Notebook. I ran with that statement as trying to use Jupyter Notebook wasted a big chunk of my time and it still wouldn’t run in the end.
Personally, I prefer VS Code; it’s lightweight, simple, and robust. Pycharm is good if you code mainly in Python, manage package/library versions, and install specific versions easily on an instance/environment of Python.
Still, if you’re looking for an online IDE to replace Jupyter Notebook: use Google Colab. It overtakes Jupyter Notebook in every regard; it’s faster, has a cleaner UI, and running code is more efficient. Moreover, Google Colab provides hosted resources, so your personal device’s specifications don’t matter for your project. I find it incredibly amazing for code applications that take a lot of GUI– plus, I faced a few issues on VS Code because of the ARM architecture on M1 Macbooks. So, yeah. Especially the part about deepface below will be better run on Google Colab if you face any issue with a local IDE.
Sorry. DeepFace. Yikes.
The first time I came across this library, I almost spat the water I was drinking because I ended up reading it as deepfake, and it cracked me up so hard. I couldn’t believe a library named deepfake existed… picture my disappointment at finding out it is deep face instead. Sigh. Alas.
Trust me, deepface is still a cool name and a pretty apt one at that too. Yeah, really. Right? (Please say yes for a little self-ego boost– see what I did there?) Anyway–
Here is how to install deepface in Python:
$ pip install deepfaceMatplotlib
Here is how to install matplotlib in Python:
$ pip install matplotlibOpenCV
This is how to install OpenCV in Python:
$ pip install opencvWith all these dependencies dealt with, it’s time to move to the real topic at hand, the cool stuff: Face Recognition with DeepFace in Python.
Face Recognition & Analysis
A modern face recognition pipeline consists of 5 stages: detect, align, normalize, represent and verify.
The best part is that it handles everything behind the scenes.
It has been proven that the right alignment increases the face recognition accuracy by almost 1%. For this purpose, OpenCV, SSD, Dlib, MTCNN, RetinaFace, and MediaPipie backend detectors are all pre-wrapped in deepface.
On the other hand, the default model deepface uses is VGG-Face– but the most accurate one is Facenet-512.
So, are you excited to learn about this? I know I was thrilled and fascinated when I first found out about this. First, I’ll go through a simple face detection project using the deep face library. After that, I’ll describe and demonstrate some more fun and advanced concepts (functions) from the deepface library. Therefore, keep reading.
The following are a few general steps you are required to follow when using a pre-trained and pre-tested model for your Python projects:
Step 1: Import Necessary Libraries
In any Machine Learning or Artificial Intelligence application, the first step usually is to import all the necessary libraries at the top of your code file in Python.
import deepface
import matplotlib.pyplot as plt
import cv2 as cv
import pprint
import JSON
import os
Step 2: Read Predictive Images
Our dataset consists of images for this particular case as the goal is to use face recognition in Python. Hence, you must read the images in your dataset before proceeding.
Note: I have used a rather small set of images here because my M1 Macbook isn’t well optimized for GPU-intensive tasks + I am always running low on storage, leading to memory swaps… Still, you can use a larger dataset if you want on something like Google Colab.
Anyway, the following code does one primary task: it creates a dynamic way of picking an image from the folder containing our dataset images. In other words: define a variable with the path to the folder storing the images; find the length of the directory — the number of items in the directory– use the listdir function in os (all tasks that use or manipulate the system resources require the os module in Python); define the specific type of image extension; combine everything into one variable that stores all of this while requiring the user’s input to select a particular image.
#Define the path with image extension for the dataset you choose to read from
prefix = "dataset/img"
# finds number of items in dataset folder
length = len(os.listdir("dataset"))
# specifies image format or extension
image_type = ".jpg"
# store complete image path in this variable
image_path = (
    prefix + input("Please enter a respective number for images from 1 to " + str(length) + " : ") + image_type
)
Now let’s read this image by using imread from OpenCV. Printing out the image type and image will help you ensure you have defined it properly. You can also choose to comment out the print(IMG) part– it will only print out the matrices.
img = cv.imread(image_path)
# img read in brg order of sequence
print(image_type)
print("image matrices are: \n")
print(img)
Step 3: Model Prediction
This step is not needed for this example. Why?
There is no need to distribute or split the dataset since we are using the existing deepface model which is pre-trained.
Step 4: Model Configuration
One more thing to do before using the model for face recognition in Python is to convert the existing BRG image to RGB in Python. This is an essential step to use the deepface module while the -1 helps maintain the saturation of the image.
# brg to rgb in python
plt.imshow(img[:, :, ::-1])
In case you forgot, plt refers to matplotlib.
Step 5: Model Run
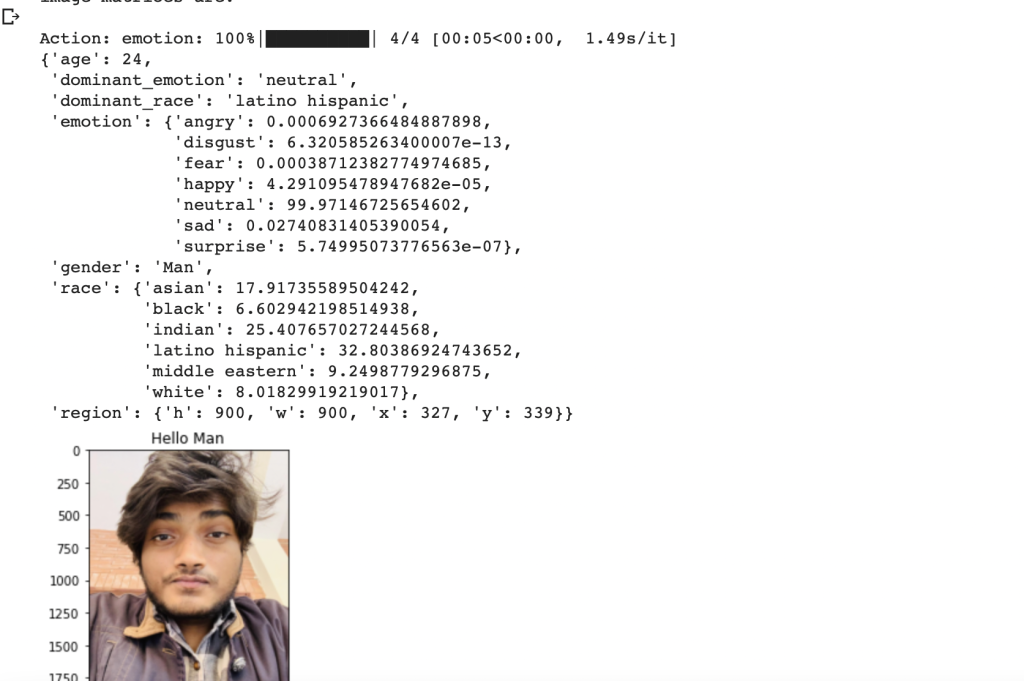
Attributes in our case, define the set of features to find from an image to perform the face recognition and analysis in Python. But it’s not necessary to define the attributes. By default, deepface will show all available attributes when you use the analyze function.
attributes = ["gender", "race", "age", "emotion"]This is the final step for face recognition in Python using deepface. Use the analyze function from the deepface module to perform the face recognition and analysis in Python on the chosen image.
result = DeepFace.analyze(img, attributes)
plt.title("Hello " + result["gender"])
pprint.print(result)
If you don’t want to pprint, your output will still be the same but it won’t be formatted. What I mean by that is it will simply be printed in an endless line that gets hard to understand. This module helps beautiful or “prettify” (as its name implies) the print output.
Diving Deep & Dark Into DeepFace:
Face Recognition in Deepface Python
Face recognition models are regular convolutional neural networks (CNNs) and they represent faces as vectors. We expect that a face pair of the same person should be more similar than a face pair of different persons.
The similarity is calculated by different metrics such as Cosine Similarity, Euclidean Distance, and L2 form. The default configuration uses Cosine Similarity.
Face Verification
Import necessary libraries
from deepface import DeepFace
import cv2
import matplotlib.pyplot as plt
import imshowpair
import pprint
What does face verification mean? Face verification refers to matching images with each other for similarity and/or identifying if images belong to the same person or not.
The code to run face verification by using deepface in Python is:
models = [
    "VGG-Face",
    "Facenet",
    "Facenet512",
    "OpenFace",
    "DeepFace",
    "DeepID",
    "ArcFace",
    "Dlib",
]

backends = ["opencv", "ssd", "dlib", "mtcnn", "retinaface", "mediapipe"]
img1 = plt.imread("/deepface_datset/taylor1.jpg")
img2 = plt.imread("/deepface_datset/taylor2.jpg")
verification = DeepFace.verify(
    img1_path=img1, img2_path="/deepface_datset/taylor2.jpg", model_name="Dlib"
)
imshowpair.imshowpair(img1, img2)
print(verification)
For this part of the post, I chose to use Taylor Swift because, well… I am a Swiftie, and I love her… music (Swifties in the house– raise your hand) + I feel like whether you love her or hate her– you know about Taylor Swift– which is the point. So, this makes for an appropriate choice.
The next task was to find some photos of Taylor Swift for face verification in Python.
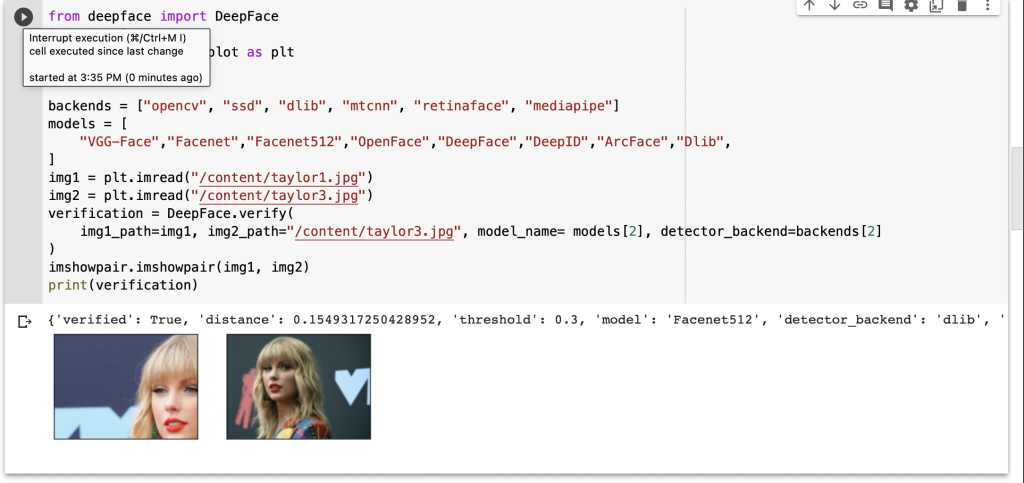
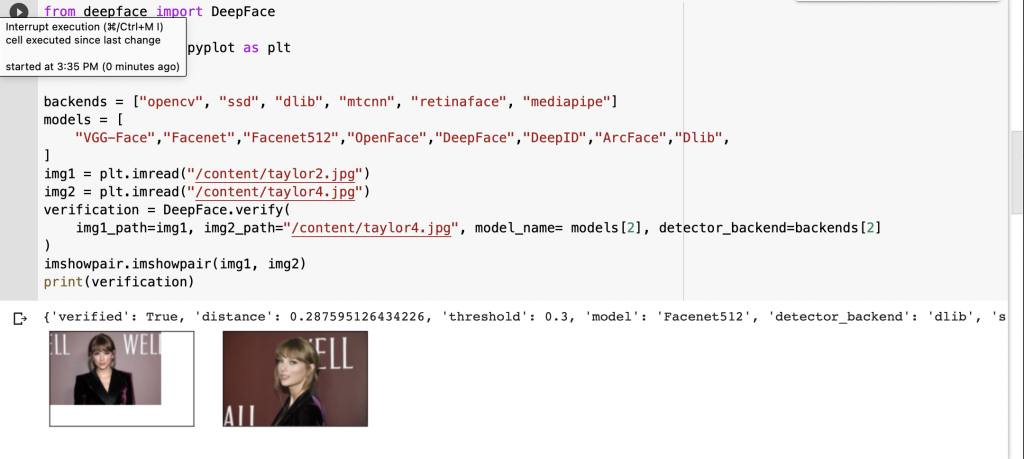
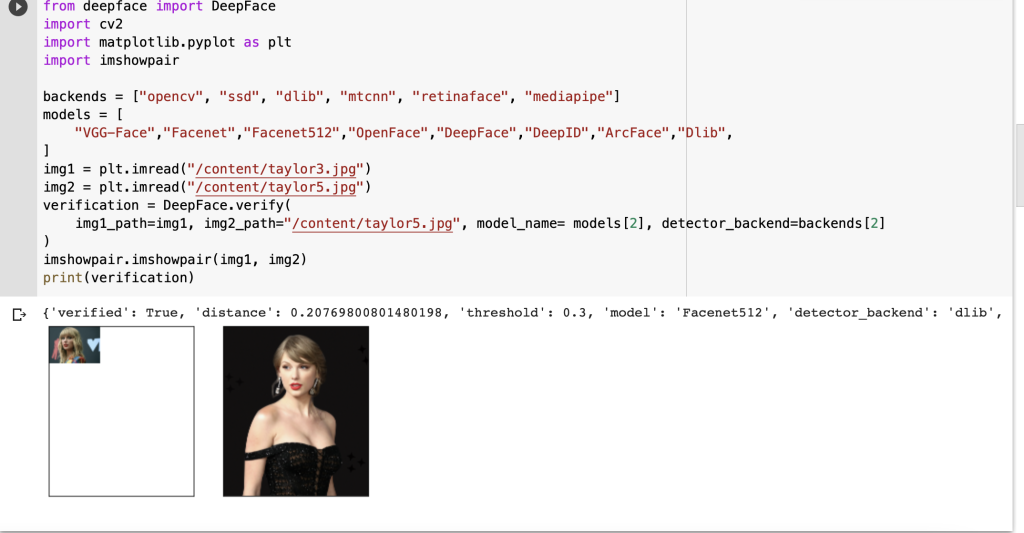
Do you see how the last one turned out really weird? This is because it’s imperative to frame your function such that the higher resolution image is chosen as image 1 and not image 2 in the verify function. Another key thing to note— you may define the path of image 1 as a string or variable, but the path of image 2 must always be a string.
Face Stream in Python
So, Face Stream is a function in Deep face that detects and reads from video streams in real-time, rather than static images only.
DeepFace.stream(db_path="deepface_dataset")
Face Recognition in Python
The term Face Recognition in Python here refers to searching for faces that match an image defined. So basically, it looks in the database path to find the identity of the person in the image and returns a pandas data frame as output.
df = DeepFace.find(img_path="taylor1.jpg", db_path="deepface_dataset/")
The representations are stored in the pkl file.
Face Analysis in Python
But what is Face Analysis exactly:?
In deepface, analyze function performs face analysis on an image. It detects the age, gender, ethnicity, emotion, and region of the person from the image.
analysis= DeepFace.analyze(img_path="deepface_detect/img2.jpg", detector_backend=backends[4])
pp = pprint.PrettyPrinter(indent=4)
pp.pprint(analysis)
Again, I chose Taylor Swift because she is a global superstar and you are likely to know Taylor Swift’s age, her ethnicity, and her gender.
Not so far off, is it? I mean, given that Taylor Swift got 32 years old a few months ago only.

Face Represent in Python
Face Representation models represent facial images as vector embeddings or more commonly as “face encodings”. The vectors should be more similar for the same person than different people. Therefore, deepface offers a representation function to find vector embeddings from facial images.
embedding = DeepFace.represent(img_path="deepface_detect/img2.jpg", model_name="Facenet")
pp = pprint.PrettyPrinter(indent=4)
pp.pprint(embedding)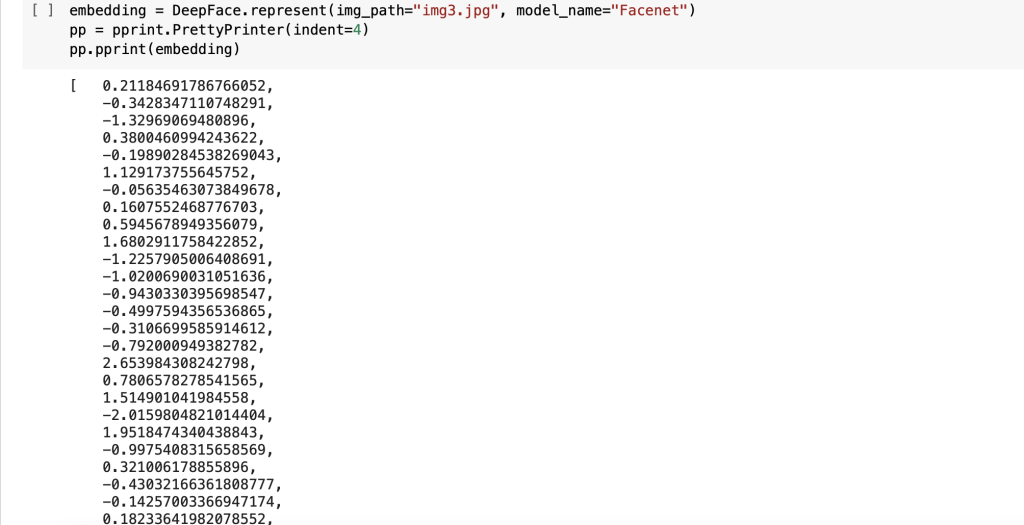
Quick note: If you are using Google Colab for this, instead of using cv2.imshow, do this:
from google.colab.patches import cv2_imshow
#use cv2_imshow() to perform the tasks imshow does
#for this tutorial, instead of using this, I used imshowpair to show two images at once
BONUS 1: Dockerize your Face Recognition in Python code
Docker is a platform as a service product. It stores apps as containers.
#Dockerfile: Image, Container
#Dockerfile-- blueprint for building images
# image is template for running Container
# container is actual project code

#specify a baseimage in this case python
#so this pulls this image from dockerhub with this python
FROM python:3.9.7

#next thing to add face-recognition-python.py to container
ADD face-recognition-python.py .

#get source destination
# . is current directory


#now install dependencies
RUN pip install cv2, face_recognition, numpy

# specify the entry command when we start container
CMD ["python", ".face-recognition-python.py"]

#be mindful of spacing after CAPS words

#now all ready for Dockerfile and need to build image #on terminal do:
#docker build filename

#docker build -t filename . The . means build into current directory
#to fix docker daemon not running on mac
#launch the Docker app. Click next. It will ask for privileged access. Confirm. A whale icon should appear in the top bar. Click it and wait for "Docker is running" to appear.
#docker run name

# for interactive usage like user input and sudo input mode:


#docker run -i filename
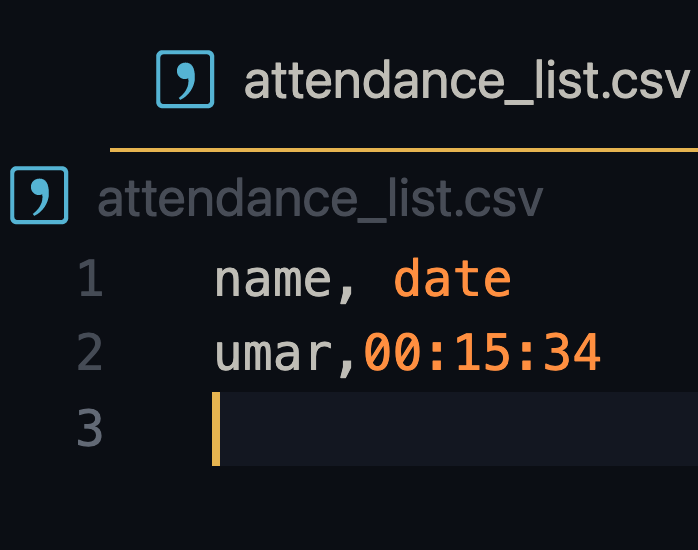
BONUS 2: Add Attendance System to Your Face Recognition in Python App
The same code will be used with one added definition in Python to mark attendance on a successful match in a CSV file.
The full code for everything on this page, including the face recognition in python with the attendance system, is available on the Sesame Disk Github repo. In particular, the code for face recognition in python with an attendance system is here.
Conclusion
In conclusion, face recognition in Python is an immensely compelling use case with wide-range applications. Face recognition in Python refers to detecting a face and then identifying the person to whom the face belongs. There are many stimulating applications for face recognition in Python like sentiment analysis, age analysis, gender analysis, and ethnicity analysis– among others. I have only applied a couple in this post, namely face recognition for general purposes and deepface, an image analysis tool. But there is so much more in this field
I have worked on this post for longer than I have worked on any other post before. It has taken a lot of time, effort, and love to craft this one for you all so that this can become your one-stop-page for all things face recognition or face detection in Python. Ultimately, that is the goal, but that’s up to you if you like it or not… that’s up to you.
Nevertheless, if you appreciate or enjoy this post, please hit that like button and drop comments with your thoughts to encourage me to bring more exciting content. Trust me when I tell you, this is only scratching the surface of what I have planned to post here in 2022. Circumstance-willing, you will see some really fantastic posts on Sesame Disk in the future.
In the past, I have written posts like Writing Your First Smart Contract in Solidity | Blockchain, Picking the SQL Database Flavor For You, and Mastering PostgreSQL and MySQL Databases In Hours. If something here interests you, go check it out. And once again, the full code for everything on this page is here.


