Kubernetes nodes: K8s setup and run apps
Setup a kubernetes multi-node cluster from scratch and run a simple app on it.
Kubernetes is a Linux based open source platform that automates or manages applications in containers. With Kubernetes, you can efficiently respond to the requests by consumers by using Kubernetes nodes.
Kubernetes is in a thriving ecosystem. Kubernetes services, support, and tools are widely available– as quoted on the Kubernetes website.
For installation, you must provide an operating system with special specifications. You can also use Kubernetes on-premise, for example, on GCP, AWS, and DigitalOcean.
Installing Kubernetes on Linux
For the installation of Kubernetes, I used CentOS 7 with two nodes connected. In the first step, you will enter your CentOS 7 servers. I used 2 CentOS 7 operating systems for the Master and Kubernetes nodes. But first, let’s change the hostnames of CentOS master and worker node.
[root@localhost ~]# hostnamectl set-hostname k8s-masterThen change the hostname on CentOS 7 worker nodes.
[root@localhost ~]# hostnamectl set-hostname k8s-nodesAfter that, we add the hostname and IP address to the master and Kubernetes nodes so they can be connected the /etc/hosts file.
Before doing so, add on the CentOS 7 master node.
[root@localhost ~]# vi /etc/hostsThen add the hostname and IP address of the master and worker nodes on the CentOS 7 worker node as well with this command:
[root@localhost ~]# vi /etc/hosts
If SELinux on CentOS 7 is still enforcing, then we need to turn off SELinux on CentOS 7 master and worker nodes.
[root@localhost ~]# setenforce 0
[root@localhost ~]# sed -i --follow-symlinks 's/SELINUX=enforcing/SELINUX=disabled/g' /etc/sysconfig/selinux
Then we configure for networking so that IPTables can forward it. We can run the below command on the CentOS 7 master and worker nodes.
[root@localhost ~]# modprobe br_netfilter
[root@localhost ~]# echo '1' > /proc/sys/net/bridge/bridge-nf-call-iptables
Another key prerequisite for installation of Kubernetes on CentOS 7 or linux is to turn off swap. Our first step is to disable it with the command below, we will do it first on the centos 7 master node.
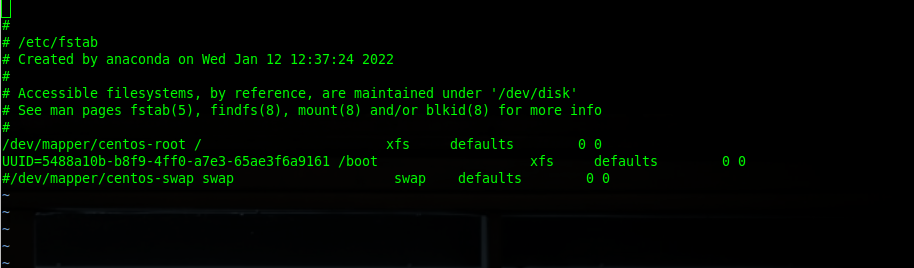
[root@localhost ~]# swapoff -aTo enable permanent, we must put a hash (#) for swap in the /etc/fstab file. We will do this first on the CentOS 7 master node.
[root@localhost ~]# vi /etc/fstabNext we will disable swap on the CentOS 7 worker node using the command below.
[root@localhost ~]# swapoff -aWe will disable permanent swap in the /etc/fstab file, just like on the CentOS 7 master node on the worker node.
Now, we will reboot both the master and worker nodes using the commands below.
[root@localhost ~]# rebootKubernetes Container: Dependencies
Before we install Docker and the Kubernetes tools, we have to install some packages on the master and worker nodes. In the following part of this post, we will install the package on the CentOS 7 master and worker nodes.
[root@k8s-master ~]# yum install yum-utils device-mapper-persistent-data lvm2 -yAfter the package is installed on the master and worker, we will add the docker repository on the CentOS 7 master and worker nodes
[root@k8s-master ~]# yum-config-manager --add-repo https://download.docker.com/linux/centos/docker-ce.repoThen we will install docker-ce on the master and worker nodes, for the first we will install on the CentOS 7 master node and worker nodes.
[root@k8s-master ~]# yum install docker-ce -yWait for until docker-ce has been successfully installed on both master and worker nodes. Enable and start docker-ce so that docker can continue when you reboot the server.
[root@k8s-master ~]# systemctl enable docker && systemctl start dockerKubernetes Nodes: Installation of Kubernetes Tools
To be able to use kubernetes on CentOS 7, the first step we have to add the kubernetes repository on CentOS 7. For that, add the Kubernetes repository on the CentOS 7 master and worker nodes.
[root@k8s-master ~]# cat <<EOF > /etc/yum.repos.d/kubernetes.repo
[kubernetes]
name=Kubernetes
baseurl=https://packages.cloud.google.com/yum/repos/kubernetes-el7-x86_64
enabled=1
gpgcheck=1
repo_gpgcheck=1
gpgkey=https://packages.cloud.google.com/yum/doc/yum-key.gpg
       https://packages.cloud.google.com/yum/doc/rpm-package-key.gpg
EOF
You have successfully added the Kubernetes repository to the master and worker nodes now.
After that, you will have to install Kubernetes and its tools on the CentOS 7 master and worker nodes.
[root@k8s-master ~]# yum install kubelet kubeadm kubectl -yAfter the installation processes on the master and worker nodes complete, activate and enable Kubernetes so that it can run properly. But first, activate it on the CentOS 7 master node.
[root@k8s-master ~]# systemctl enable kubelet && systemctl start kubeletThen, enable and activate Kubernetes on the CentOS 7 worker node.
[root@k8s-nodes ~]# systemctl enable kubelet && systemctl start kubeletIn the next step, equate the cgroup driver of docker and Kubernetes. The first step you must check is the cgroup driver on docker using this command on the master node CentOS 7.
[root@k8s-master ~]# docker info | grep -i 'cgroup driver'Then, add the cgroup driver that was found into the /etc/sysconfig/kubelet file on the CentOS 7 master and worker nodes.
[root@k8s-master ~]# vi /etc/sysconfig/kubeletSetup Kubernetes Nodes
If you have set up the cgroup, you will create an init network with kubeadm on the CentOS 7 master node.
[root@k8s-master ~]# kubeadm init --pod-network-cidr=10.244.0.0/16If the process goes smoothly, it will display this:
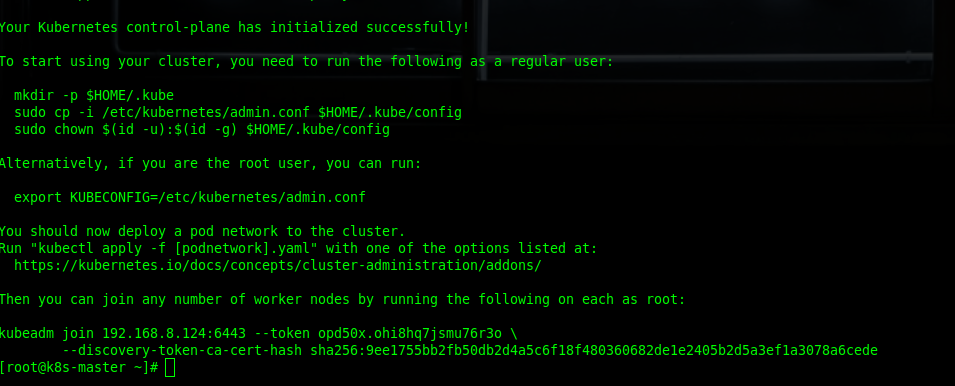
Run this command so that that Kubernetes runs properly.
[root@k8s-master ~]# mkdir -p $HOME/.kube
[root@k8s-master ~]# sudo cp -i /etc/kubernetes/admin.conf $HOME/.kube/config
[root@k8s-master ~]# sudo chown $(id -u):$(id -g) $HOME/.kube/config
Then you may run the command below to see if the node is running properly or not.
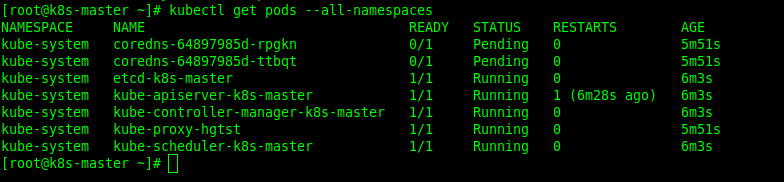
[root@k8s-master ~]# kubectl get nodesAfter that, check the pods in kubernetes.
To make nodes ready, you have to add add pods i.e. weave-net. Add it with this command:
[root@k8s-master ~]# kubectl apply -f "https://cloud.weave.works/k8s/net?k8s-version=$(kubectl version | base64 | tr -d '\n')" Check again the Kubernetes node; maybe you need to wait a while for the node to be ready.
[root@k8s-master ~]# kubectl get nodesWhen the node is ready, combine the master and worker nodes with the tokens created from the previous kubeadm init.
[root@k8s-master ~]# kubeadm join 192.168.8.124:6443 --token opd50x.ohi8hq7jsmu76r3o \
	--discovery-token-ca-cert-hash sha256:9ee1755bb2fb50db2d4a5c6f18f480360682de1e2405b2d5a3ef1a3078a6cede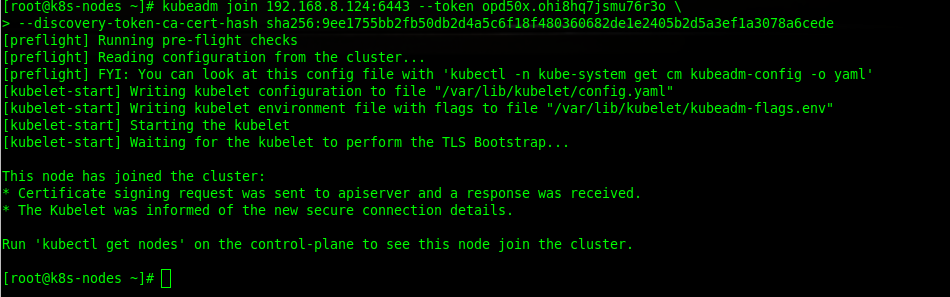
Once the master node is joined to the worker node, you need to describe the worker node so it can be ready on the master node.
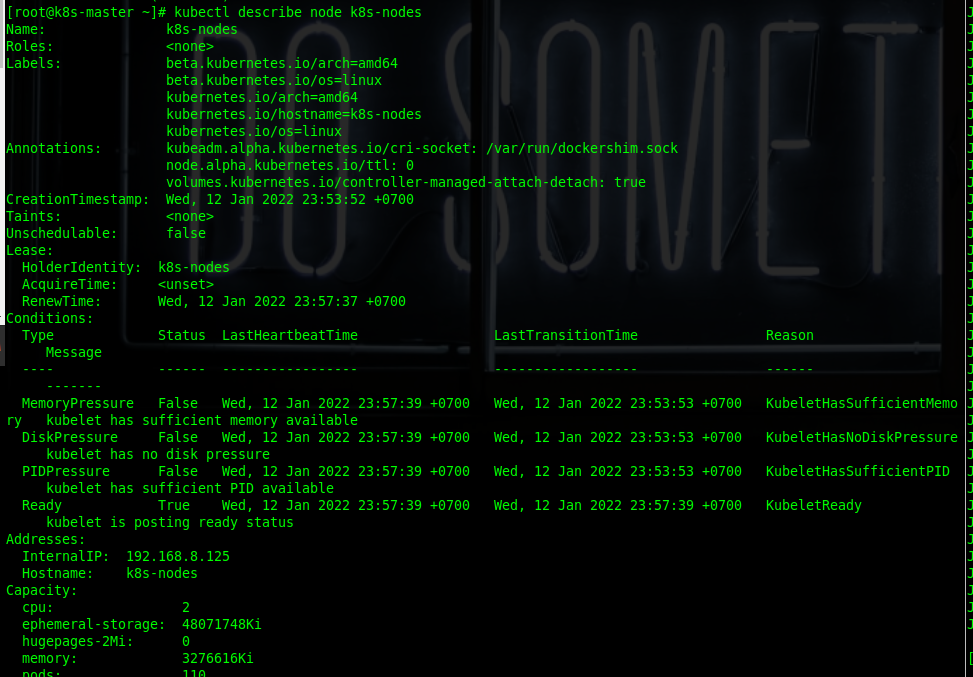
After that, you can use this command to see if both nodes are ready to use.
[root@k8s-master ~]# kubectl get nodesWe have seen that the node is ready, so the next step will be to create a label for the worker node role with the command below.
[root@k8s-master ~]# kubectl label node k8s-nodes node-role.kubernetes.io/worker=workerThen, check the nodes again. You will see that the roles on the worker node have changed.

Build Nginx Contaienr Apps
In this part, you will build an Nginx container in Kubernetes. Nginx functions as a very powerful web server for our needs. You can create an nginx deployment with the following command:
[root@k8s-master ~]# kubectl create deployment nginx --image=nginxIf the nginx deployment has been created, then check the deployment with this command to see a list:
[root@k8s-master ~]# kubectl get deploymentsTo describe deployment of nginx, use the following command.
[root@k8s-master ~]# kubectl describe deployment nginxBy describing the nginx deployment you will be able to find out complete information on the nginx deployment.
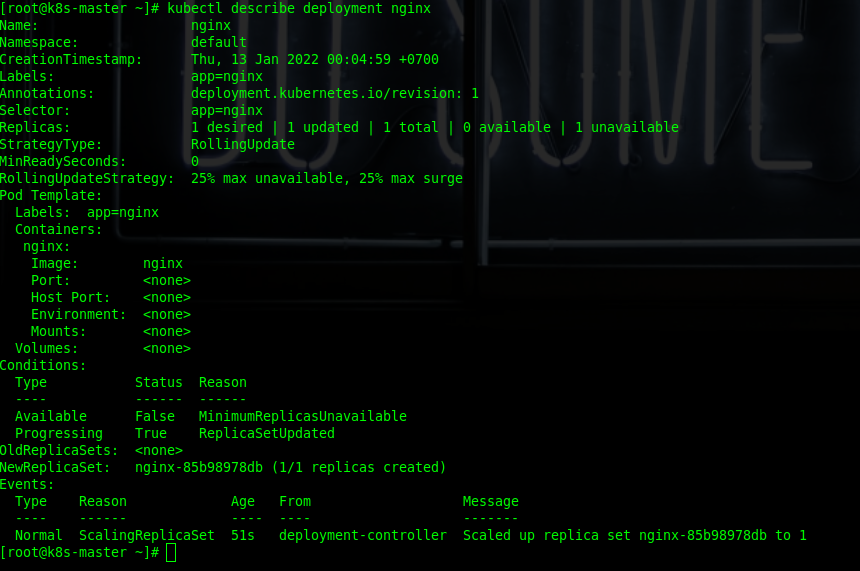
Then we can create an nginx service with this command.
[root@k8s-master ~]# kubectl create service nodeport nginx --tcp=80:80After that, use this command below to check the service port on nginx.
[root@k8s-master ~]# kubectl get svcTo check the nginx service, you can use curl with this command “curl -v ip_private:port or hostname:port “.
[root@k8s-master ~]# curl -v k8s-nodes:31173To remove deployment on nginx using kubectl, use this command.

Conclusion
Kubernetes is invaluable for us to use as a cloud-native because considering that it is open-source, it has many features for scaling and managing containers in multiple nodes. You can read How to Use MySQL with Haproxy Load Balance if you previously used Docker. With Kubernetes, your managed container will be even more powerful.
I hope you found this post to be interesting. What I would love is that you were to follow along this tutorial and see if you face any problems. You can comment these problems below and I will help you out. Don’t forget to subscribe to our blog!
Edited By: Syed Umar Bukhari