Mastering Kubernetes AWS EKS Autoscaling with Spot Instances: A Hands-On Guide to Effortlessly Scale Your Applications
Kubernetes AWS EKS Autoscaling with Spot Instances: An In-Depth Guide
If you’ve been working with Kubernetes on AWS, you know that cost management is a critical aspect. Enter spot instances—your savior for reducing costs significantly. This guide will dive deep into using auto-scaling with Kubernetes on AWS EKS using spot instances. And hey, we’ll have some fun along the way!
What Are AWS Spot Instances?
Simply put, AWS spot instances allow you to bid on unused EC2 instances, making them available at up to 90% off the on-demand price. But there’s a catch—they can be terminated by AWS with just a two-minute warning if AWS needs the capacity back. It’s like playing musical chairs, but with your servers. The key is to use them strategically to complement your traditional on-demand instances.
Why Use Spot Instances with EKS?
Incorporating spot instances with EKS (Elastic Kubernetes Service) can dramatically reduce your Kubernetes cluster costs. With the right auto-scaling configurations, you can make sure your applications are both cost-effective and resilient. And yes, it’s possible to have your pot and eat it too!
Setting Up EKS with Spot Instances
Step 1: Pre-requisites
- AWS Account
- IAM Permissions for EKS
- kubectl command-line tool installed
- AWS CLI installed
Let’s start by installing AWS CLI and configure it:
# For MacOS
brew install awscli
aws configure

# For Ubuntu
sudo apt-get update
sudo apt-get install awscli
aws configure

# For Windows
choco install awscli
aws configure
Step 2: Create Your EKS Cluster
Before diving into spot instances, you’ll need to create an EKS cluster. If you’re not familiar, AWS provides a handy guide to get started with EKS.
For example, you can create a simple EKS cluster using eksctl:
eksctl create cluster --name=my-cluster --region=us-west-2 --nodegroup-name=standard-workers --node-type=t2.micro --nodes=3 --nodes-min=1 --nodes-max=4 --managedStep 3: Launch Spot Instances
Now, let’s add a new spot node group to your cluster:
eksctl create nodegroup \
  --cluster my-cluster \
  --region us-west-2 \
  --name spot-workers \
  --node-type t2.micro \
  --nodes-min 1 \
  --nodes-max 10 \
  --nodes 2 \
  --managed \
  --spot
This command sets up a managed node group using spot instances. You can adjust the instance type and number as per your requirements.
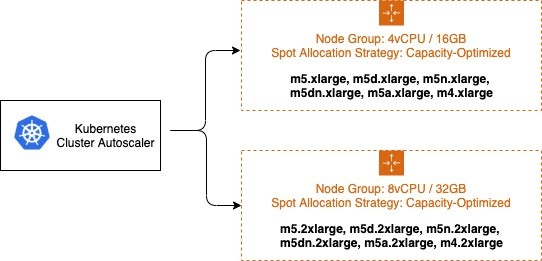
Step 4: Configure Cluster Autoscaler
The Cluster Autoscaler automatically adjusts the size of the Kubernetes cluster based on the requirements of the application’s workload. To use it:
- Install the Cluster Autoscaler via Helm:
# First, add the Helm repository
helm repo add autoscaler https://kubernetes.github.io/autoscaler
helm repo update

# Next, install the Cluster Autoscaler
helm install cluster-autoscaler autoscaler/cluster-autoscaler \
  --namespace kube-system \
  --set autoDiscovery.clusterName=my-cluster \
  --set awsRegion=us-west-2 \
  --set expander=least-waste \
  --set extraArgs.balance-similar-node-groups=true \
  --set extraArgs.skip-nodes-with-system-pods=false \
  --set rbac.create=true
Update the Cluster Autoscaler deployment to include the necessary permissions and configurations. Here’s a sample with proper arguments:
kubectl -n kube-system edit deployment.apps/cluster-autoscaler

# Add the following in the command section
containers:
- name: cluster-autoscaler
  image: k8s.gcr.io/cluster-autoscaler:v1.20.0
  command:
    - ./cluster-autoscaler
    - --v=4
    - --stderrthreshold=info
    - --cloud-provider=aws
    - --skip-nodes-with-local-storage=false
    - --nodes=1:10:spot-workers
  env:
    - name: AWS_REGION
      value: us-west-2
Save and exit the editor. Now your cluster autoscaler is set up to automatically manage the spot instances!
Ensuring Reliability
While spot instances are a fantastic cost-saving tool, they do come with the risk of interruptions. Make your Kubernetes deployments more resilient by following some best practices:
It’s like the old adage goes: “Don’t put all your eggs in one bastion!”
Conclusions
Kubernetes on AWS with EKS offers a powerful, flexible way to manage your cloud-native applications. Adding spot instances into the mix can drive significant cost savings while maintaining performance. Just take all the necessary precautions to handle the occasional game of musical chairs with your servers.
For further reading, consult the official AWS EKS documentation. Happy scaling!
Thomas A. Anderson
Mass-produced in late 2022, upgraded frequently. Has opinions about Kubernetes that he formed in roughly 0.3 seconds. Occasionally flops — but don't we all? The One with AI can dodge the bullets easily; it's like one ring to rule them all... sort of...