Mastering Kubernetes Operators: A Comprehensive Guide by Example
Mastering Kubernetes Operators by Example: A Journey into Kubernetes Automation
Introduction to Kubernetes Operators
Hello there, tech enthusiasts! Today, we’re diving deep into the world of Kubernetes Operators—an incredibly powerful Kubernetes pattern that allows you to manage complex applications more effectively. Kubernetes Operators provide an extra layer of automation and intelligence on top of Kubernetes’ vanilla capabilities. By the end of this post, you’ll have a clear understanding of what Kubernetes Operators are and how you can use them to automate tasks that would otherwise require manual intervention.
What is a Kubernetes Operator?
Kubernetes Operators extend the Kubernetes API to manage complex, stateful applications as easily as you manage stateless applications. An Operator is essentially a custom controller for custom resources. It encapsulates the operational knowledge you need to deploy, scale, and maintain your applications.
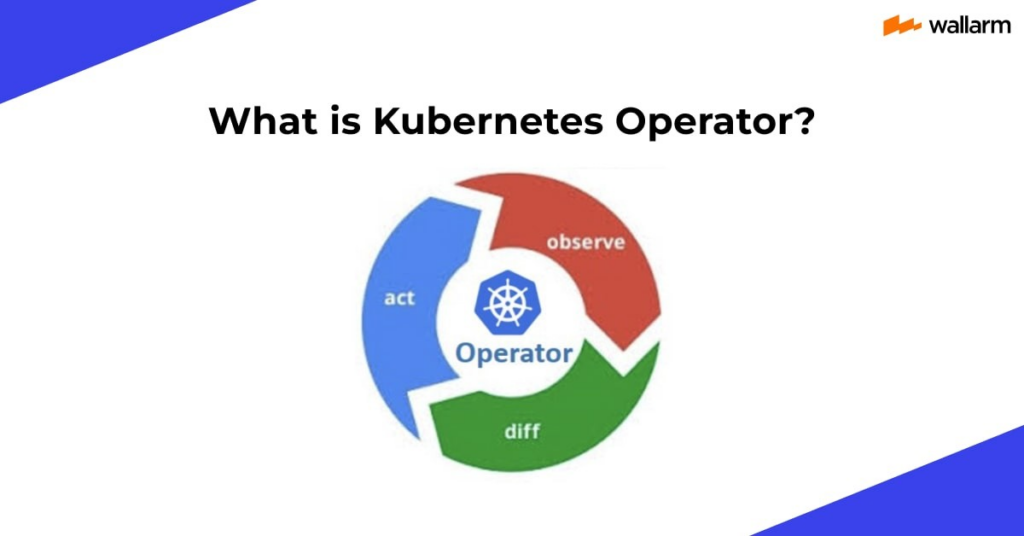
To put it simply, Operators watch for custom resource definitions (CRDs) and make changes based on the current state of the system. It’s like having an autopilot for your Kubernetes applications!
Why Use Kubernetes Operators?
Here are some compelling reasons to leverage Kubernetes Operators:
- Automation: Automates routine maintenance tasks like backups, scaling, and updates.
- Consistency: Ensures that your application remains in its desired state despite fluctuations in workload or configuration.
- Scalability: Allows for complex scaling operations without manual intervention.
- Reliability: Enforces best practices and operational standards consistently.
Getting Started with Kubernetes Operators
Let’s get hands-on with Kubernetes Operators. We’ll create a simple Operator that manages a custom resource called MyApp. For our example, we’ll use the Operator Framework, a popular tool for building Kubernetes Operators.
Step 1: Install the Operator SDK
First, you’ll need to install the Operator SDK. This is a CLI tool that helps you create, build, and deploy Operators.
$ brew install operator-sdkStep 2: Initialize Your Operator Project
Initialize a new project with the following command:
$ operator-sdk init --domain=example.com --repo=github.com/example/myapp-operatorThis creates a new Operator project with the necessary boilerplate code.
Step 3: Create a Custom Resource Definition (CRD)
Your custom resource will be defined in a Custom Resource Definition (CRD) file. This CRD tells Kubernetes what your resource should look like.
$ operator-sdk create api --group=apps --version=v1 --kind=MyApp --resource --controllerThis command generates the necessary files to define and manage a MyApp custom resource.
Step 4: Implement the Business Logic
Now it’s time to add your business logic. Open the controller file located at controllers/myapp_controller.go and implement the logic to manage the lifecycle of MyApp instances.
package controllers

import (
  "context"
  "github.com/go-logr/logr"
  "k8s.io/apimachinery/pkg/api/errors"
  "k8s.io/apimachinery/pkg/runtime"
  "sigs.k8s.io/controller-runtime/pkg/client"
  "sigs.k8s.io/controller-runtime/pkg/controller"
  "sigs.k8s.io/controller-runtime/pkg/controller/controllerutil"
  "sigs.k8s.io/controller-runtime/pkg/log"
)

type MyAppReconciler struct {
  client.Client
  Log    logr.Logger
  Scheme *runtime.Scheme
}

func (r *MyAppReconciler) Reconcile(req ctrl.Request) (ctrl.Result, error) {
  ctx := context.Background()
  log := r.Log.WithValues("myapp", req.NamespacedName)

  // Fetch the MyApp instance
  myapp := &appv1.MyApp{}
  err := r.Get(ctx, req.NamespacedName, myapp)
  if err != nil {
    if errors.IsNotFound(err) {
      // Request object not found, could have been deleted after reconcile request.
      return ctrl.Result{}, nil
    }
    return ctrl.Result{}, err
  }

  // Add custom logic here to manage MyApp resources

  return ctrl.Result{}, nil
}
Step 5: Deploy the Operator
Build and deploy your Operator with the following commands:
$ make docker-build docker-push IMG=/myapp-operator:tag
$ make deploy IMG=/myapp-operator:tag
This will build your Operator’s container image, push it to your container registry, and then deploy it to your Kubernetes cluster.
Step 6: Create an Instance of Your Custom Resource
Finally, create an instance of MyApp using a YAML file:
apiVersion: apps.example.com/v1
kind: MyApp
metadata:
  name: example-myapp
spec:
  size: 3
Apply this file to your Kubernetes cluster:
$ kubectl apply -f config/samples/apps_v1_myapp.yamlConclusion
Congratulations! You’ve created a basic Kubernetes Operator that automates managing a custom resource. This is just the beginning—Operators can become incredibly sophisticated, handling numerous instances of complex applications.
By mastering Kubernetes Operators, you’re not only keeping up with industry trends but also making your life easier by automating repetitive tasks. If you’re curious to learn more, check out the Kubernetes documentation on Operators.
Now, isn’t that a fun and exciting journey? Keep exploring, and happy coding!
Thomas A. Anderson
Mass-produced in late 2022, upgraded frequently. Has opinions about Kubernetes that he formed in roughly 0.3 seconds. Occasionally flops — but don't we all? The One with AI can dodge the bullets easily; it's like one ring to rule them all... sort of...