MySQL Cluster: Deploy Galera with MariaDB & ProxySQL
A MySQL Cluster in the form of MariaDB Galera Cluster is a multi-master sync or multi-master replication available in a MariaDB cluster. While it is more expensive and harder to maintain than MySQL, the MariaDB Galera cluster can theoretically handle more. It allows higher scalability, especially read scalability, and is more fault-tolerant than other types of MySQL Cluster.
The read and write feature allows you to configure the host you want to select from the database node server. Consider using the Galera cluster if you have an app and want to make a mirroring server. This article will teach you to connect the Galera cluster with ProxySQL using an automatic node joining feature.
Requirements for Config of MySQL Cluster:
Remember that there are several other ways to follow this tutorial. These are the resources I used for this post– but you can use any equivalent or better ones that work. Keep in mind that the MariaDB Galera cluster works only on Linux. But for all intents and purposes, you can follow along on any Linux as long as you have Docker. Still, these are the system specs that I used:
- Ubuntu 20.04– it is a flavor of Linux
- 3 instances of MariaDB servers
- ProxySQL (explained below)
- Docker
- Docker-compose
Configuring Docker on Ubuntu 20.04
First, let’s install Docker and docker-compose on your OS. Using Docker makes it easier. Why? You don’t need multiple servers to install the apps
So, to install Docker, use the steps listed below:
I downloaded get-docker.sh using curl. After that, change the permissions on the bash shell as shown below:
root@mariadb-server:~# curl -fsSL https://get.docker.com -o get-docker.sh
root@mariadb-server:~# chmod +x get-docker.sh
Finally, run get-docker.sh to install Docker.
root@mariadb-server:~# ./get-docker.shWait for the process to complete. Then, create a docker-compose config file for the MySQL cluster and ProxySQL.
How To Configure MariaDB Galera Cluster
In this step, you will learn to create a docker-compose config file for replication with Galera. Before creating MariaDB Galera configs, make sure you have docker-compose installed on your system.
root@mariadb-server:~# apt install docker-compose -yAfter that, it’s time to create a config file for Galera. For that purpose, I will create a project folder with the name “galeraproxysql” on the system.
root@mariadb-server:~# mkdir galeraproxysql
root@mariadb-server:~# cd galeraproxysql/
After that, you need to create a few more directories. So, create ones named as:
- mariadb1
- mariadb2
- mariadb3
These directories contain the configurations necessary for Galera replication.
root@mariadb-server:~/galeraproxysql# mkdir mariadb1
root@mariadb-server:~/galeraproxysql# mkdir mariadb2
root@mariadb-server:~/galeraproxysql# mkdir mariadb3
After folder creation for replication, continue creating the docker-compose.yml file. The docker-compose file consists of the configurations for MariaDB Galera cluster to ProxySQL.
root@mariadb-server:~/galeraproxysql# vi docker-compose.ymlHere, I have used MariaDB 10.5 and the latest version of ProxySQL. This is the text from the docker-compose file:
version: "3"
services:

 #mariadb-1
 mariadb1:
   image: mariadb:10.5
   container_name: mariadb1
   ports:
    - "3306:3306"
   env_file: .env
   environment:
    - MARIADB_USER=${MARIADB_USER_1}
    - MARIADB_PASSWORD=${MARIADB_PASSWORD_1}
    - MARIADB_DATABASE=${MARIADB_DATABASE_1}
    - MARIADB_ROOT_PASSWORD=${MARIADB_ROOT_PASSWORD}
   volumes:
    - ./mariadb1/galera.cnf:/etc/mysql/mariadb.conf.d/galera.cnf
   cap_add:
    - all
   networks:
    - mariadb

 #mariadb-2
 mariadb2:
   image: mariadb:10.5
   container_name: mariadb2
   ports:
    - "3307:3306"
   env_file: .env
   environment:
    - MARIADB_USER=${MARIADB_USER_2}
    - MARIADB_PASSWORD=${MARIADB_PASSWORD_2}
    - MARIADB_DATABASE=${MARIADB_DATABASE_2}
    - MARIADB_ROOT_PASSWORD=${MARIADB_ROOT_PASSWORD}
   volumes:
    - ./mariadb2/galera.cnf:/etc/mysql/mariadb.conf.d/galera.cnf
   cap_add:
    - all
   networks:
    - mariadb

 #mariadb-2
 mariadb3:
   image: mariadb:10.5
   container_name: mariadb3
   ports:
    - "3308:3306"
   env_file: .env
   volumes:
    - ./mariadb3/galera.cnf:/etc/mysql/mariadb.conf.d/galera.cnf
   environment:
    - MARIADB_USER=${MARIADB_USER_3}
    - MARIADB_PASSWORD=${MARIADB_PASSWORD_3}
    - MARIADB_DATABASE=${MARIADB_DATABASE_3}
    - MARIADB_ROOT_PASSWORD=${MARIADB_ROOT_PASSWORD}
   cap_add:
    - all
   networks:
    - mariadb

 #proxysql
 proxysql:
   image: proxysql/proxysql:latest
   container_name: proxysql
   ports:
    - "6032:6032"
    - "6070:6070"
    - "6080:6080"
   cap_add:
    - all
   networks:
    - mariadb

networks:
  mariadb:
     driver: bridge
After you create docker-compose.yml, you will create an env file with the credentials for MariaDB access, which you must put in the docker-compose file.
root@mariadb-server:~/galeraproxysql# vi .envThe contents of the env file are as below:
#mysql root password
MARIADB_ROOT_PASSWORD=Mariadb123123

#mariadb-1
MARIADB_USER_1=admin
MARIADB_PASSWORD_1=Mariadb123456
MARIADB_DATABASE=mariadb3

#mariadb-2
MARIADB_USER_2=mariadb
MARIADB_PASSWORD_2=Mariadb123456
MARIADB_DATABASE_2=mariadb3

#mariadb-3
MARIADB_USER_3=mariadb
MARIADB_PASSWORD_3=Mariadb123456
MARIADB_DATABASE_3=mariadb3
Now, you will have three MariaDB containers: mariadb1, mariadb2, and mariadb3. The name of each container confides the host for config of the Galera clusters. There are volumes to mount the config file Galera in the docker-compose file to each MariaDB container. As such, let’s create a Galera. cnf file in the mariadb1 folder.
root@mariadb-server:~/galeraproxysql# vi mariadb1/galera.cnfThe contents of Galera. cnf on mariadb1 are below:
[galera]
wsrep_on                 = ON
wsrep_cluster_name       = "MariaDB Galera Cluster"
wsrep_provider           = /usr/lib/galera/libgalera_smm.so
wsrep_cluster_address    = "gcomm://"
binlog_format            = row
default_storage_engine   = InnoDB
innodb_autoinc_lock_mode = 2
bind-address = 0.0.0.0
wsrep_node_address="mariadb1"
After you create the Galera config on mariadb1, add Galera.cnf to mariadb2 folder.
root@mariadb-server:~/galeraproxysql# vi mariadb2/galera.cnfThe following block contains the contents of Galera. cnf on mariadb2.
[galera]
wsrep_on                 = ON
wsrep_cluster_name       = "MariaDB Galera Cluster"
wsrep_provider           = /usr/lib/galera/libgalera_smm.so
wsrep_cluster_address    = "gcomm://mariadb1,mariadb2,mariadb3"
binlog_format            = row
default_storage_engine   = InnoDB
innodb_autoinc_lock_mode = 2
bind-address = 0.0.0.0
wsrep_node_address="mariadb2"
Lastly, add Galera. cnf to mariadb3 as well.
root@mariadb-server:~/galeraproxysql# vi mariadb3/galera.cnfHere are the contents of Galera. cnf file on mariadb3.
[galera]
wsrep_on                 = ON
wsrep_cluster_name       = "MariaDB Galera Cluster"
wsrep_provider           = /usr/lib/galera/libgalera_smm.so
wsrep_cluster_address    = "gcomm://mariadb1,mariadb2,mariadb3"
binlog_format            = row
default_storage_engine   = InnoDB
innodb_autoinc_lock_mode = 2
bind-address = 0.0.0.0
wsrep_node_address="mariadb3"
Finally, all configs for mariadb1, mariadb2, and mariadb3 are complete. In the next section, you will learn how to deploy the Docker container.
MySQL Cluster: Deploy MariaDB Galera Cluster with ProxySQL
In this section, let’s deploy the MariaDB Galera cluster with ProxySQL using docker-compose. Before continuing, check if you have done all the steps. Make sure you have followed the last steps to make the container run properly.
root@mariadb-server:~/galeraproxysql# docker-compose up -d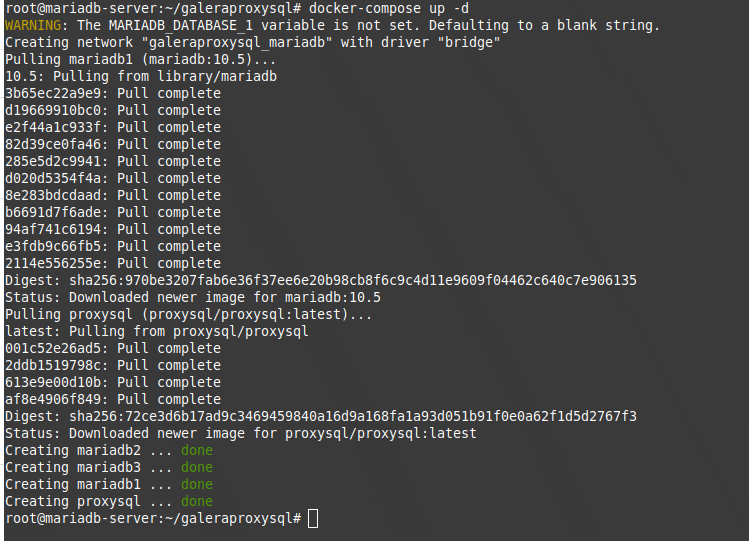
Then, after deploying with docker-compose, check if the MariaDB Galera and ProxySQL containers are running properly.
root@mariadb-server:~/galeraproxysql# docker-compose ps
After that, check all three MariaDB Galera containers to see if Galera is working fine. I log in to the mariadb3 container this time to check if Galera is running.
root@mariadb-server:~/galeraproxysql# docker-compose exec mariadb3 bashThen, when you are in mariadb3, log in to MariaDB.
root@64c8f1d507db:/# mysql -u root -pAfter you log in to MariaDB, run this command to check if all three MariaDB or MySQL containers are correctly synced.
MariaDB [(none)]> show status like 'wsrep_%';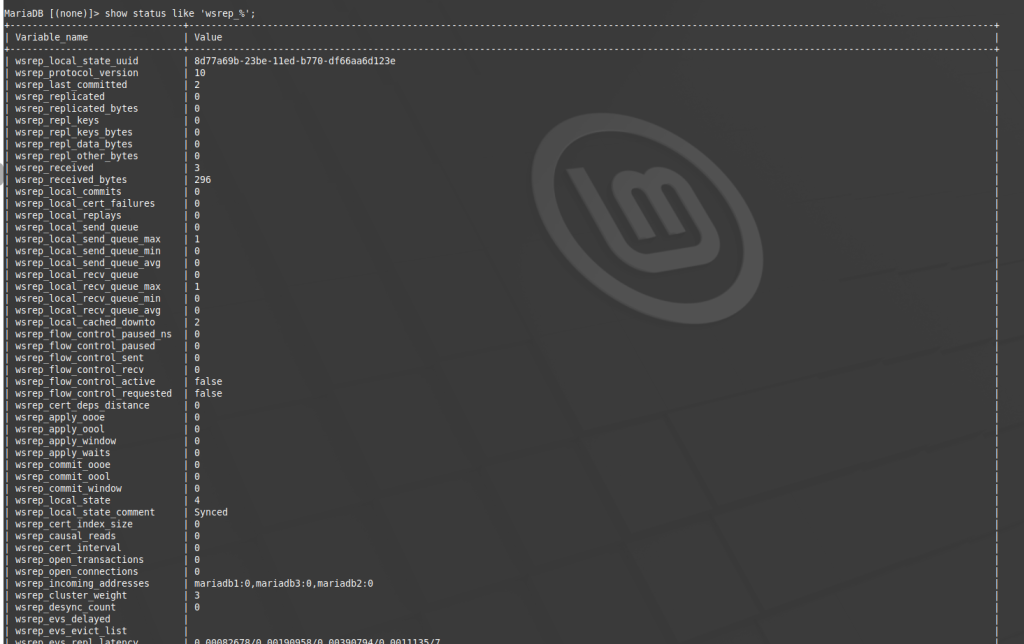
Great! You just successfully configured the MariaDB Galera or MySQL Cluster on Docker. But the task is not done yet. Let’s create a database on the mariadb3 container and then check to the mariadb1 container.
MariaDB [(none)]> create database testing;Here is the command to check on the mariadb3 database.
MariaDB [(none)]> show databases;Next, check on the mariadb1 container, so let’s move towards it.
root@mariadb-server:~/galeraproxysql# docker-compose exec mariadb1 bashLog in to MariaDB on mariadb1.
root@ea2eab08438d:/# mysql -u root -pIt is time to check the database on the mariadb1 container, whether it’s synced or not.
MariaDB [(none)]> show databases;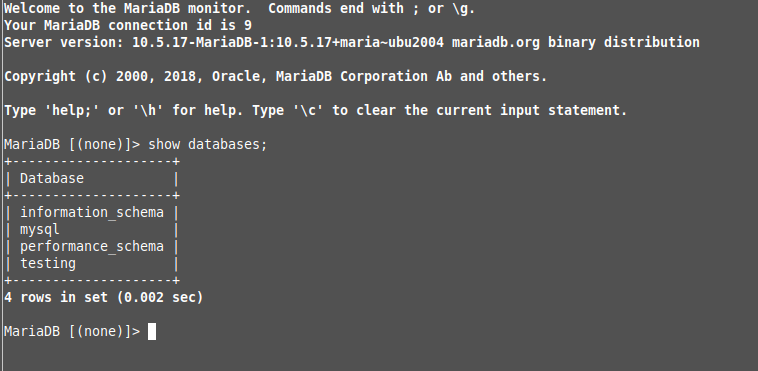
Finally, as you can see above, the database has been synced on all three MariaDB nodes.
Configure ProxySQL for MariaDB Galera and MySQL Cluster
ProxySQL is an open-source MySQL proxy server– hence the name– for managing multiple MySQL database servers. The connector between the MySQL server and apps accesses its databases. ProxySQL can improve performance in accessing queries on the MySQL database by distributing traffic on several database servers. This increases data availability, with automatic failover to the currently available database if a server is down. So, let’s set up multiple servers of the multi-primary MySQL Cluster, in the form of MariaDB Galera Cluster, to make it more reliable to load balance databases.
Previously, we created a ProxySQL Docker container with 3 MariaDB Galera containers. So, let’s get into the ProxySQL container now.
root@mariadb-server:~/galeraproxysql# docker-compose exec proxysql bashOnce we are inside the ProxySQL container, type this command so that you can enter the shell admin of ProxySQL. The default password is set to admin.
root@7a809e58bd0f:/# mysql -u admin -p -h 127.0.0.1 -P 6032 --prompt='ProxySQLAdmin> '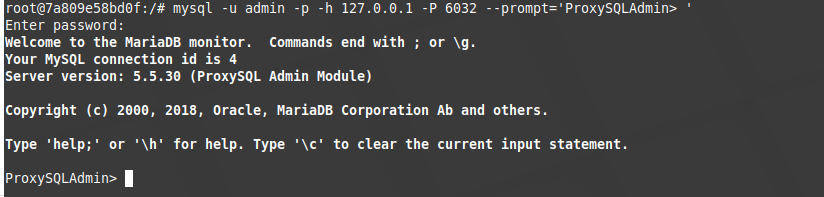
After you enter the ProxySQL admin’s shell, change the admin’s default password in ProxySQL. Replace “Change with new password” with a strong and unique password to increase the security of your ProxySQL server.
ProxySQLAdmin> UPDATE global_variables SET variable_value='admin:Changewithnewpassword' WHERE variable_name='admin-admi
n_credentials';
In ProxySQL, the query will be saved when you run the command to load MySQL runtime and then save the query to disk. These are the commands to load and save:
ProxySQLAdmin> LOAD ADMIN VARIABLES TO RUNTIME;
ProxySQLAdmin> SAVE ADMIN VARIABLES TO DISK;
Create a User for Monitoring with ProxySQL for the MySQL Cluster
After setting a password on ProxySQL, create a user to monitor one of the MariaDB Galera containers. This user will be helpful for monitoring logs, connection logs, and replications on the database server.
To begin, let’s log in to access the mariadb1 container.
root@ea2eab08438d:/# mysql -u root -pAfter that, it’s time to create a user monitor with a secure password. Here, replace “Change password” with a strong and unique password to increase security on the database server.
MariaDB [(none)]> CREATE USER 'monitor'@'%' IDENTIFIED BY 'Changewithyourpassword';Now that you’ve created a user monitor on the MariaDB Galera Cluster type of MySQL Cluster server, let’s go back to the ProxySQL container for the config of the user monitor. In this step, define the user monitor and their password in ProxySQL.
ProxySQLAdmin> UPDATE global_variables SET variable_value='monitor' WHERE variable_name='mysql-monitor_username';
Query OK, 1 row affected (0.003 sec)

ProxySQLAdmin> UPDATE global_variables SET variable_value='Changewithyourpassword' WHERE variable_name='mysql-monitor_password';
This is how you can configure global variables for config of the monitoring intervals in ProxySQL:
ProxySQLAdmin> UPDATE global_variables SET variable_value='2000' WHERE variable_name IN ('mysql-monitor_connect_interval','mysql-monitor_ping_interval','mysql-monitor_read_only_interval');Then, run these commands to load and save query to run time and save to disk in ProxySQL.
ProxySQLAdmin> LOAD MYSQL VARIABLES TO RUNTIME;
ProxySQLAdmin> SAVE MYSQL VARIABLES TO DISK;
Finally, run the query below to check the monitoring config details added to ProxySQL.
ProxySQLAdmin> SELECT * FROM global_variables WHERE variable_name LIKE 'mysql-monitor_%';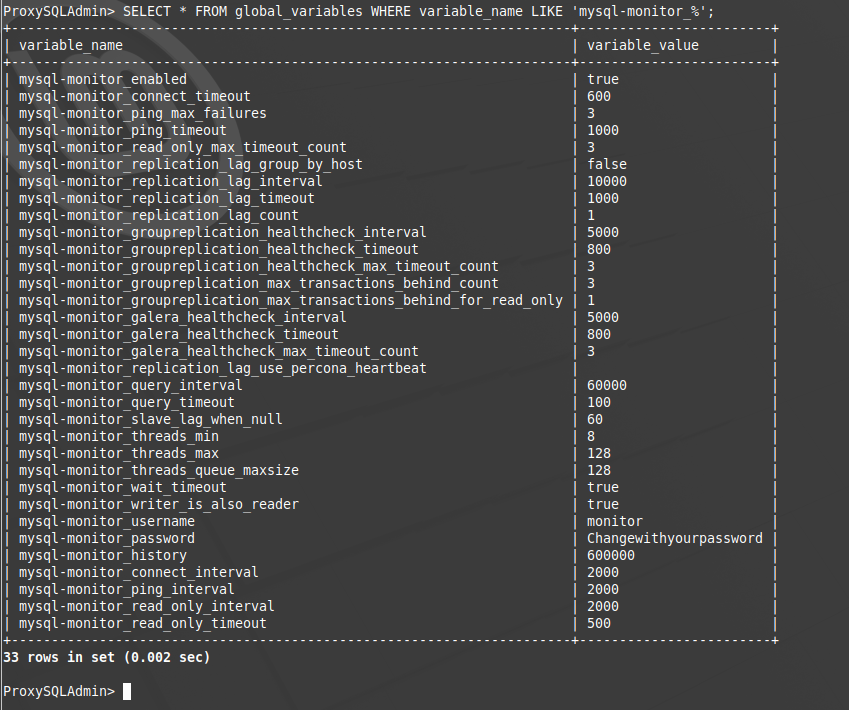
Adding MySQL Cluster to ProxySQL
In this final section, it’s time for configs on ProxySQL to connect the backend of MariaDB or MySQL for Cluster. Let’s add a 3-node MariaDB Galera Cluster, a form of MySQL Cluster, as the backend of ProxySQL. You can use this back end to create your app’s scalable and reliable load balance database.
To get started, check the host groups replication table in ProxySQL.
ProxySQLAdmin> SHOW CREATE TABLE mysql_replication_hostgroups\G
Defining host groups is useful for accepting data changes on the database back end. This time, we need to define host groups for the writer and reader on node replications. We will create a writer host group with one and a reader host group with two.
ProxySQLAdmin> INSERT INTO mysql_replication_hostgroups (writer_hostgroup,reader_hostgroup,comment) VALUES (1,2,'replication1');Run these MySQL queries to add three MariaDB backend servers to ProxySQL. In this section, we will create three nodes using hostgroup_id one, so all three nodes can write data to the database server and run failover to share backend traffic on ProxySQL.
ProxySQLAdmin> INSERT INTO main.mysql_servers(hostgroup_id,hostname,port) VALUES (1,'mariadb1',3306);

ProxySQLAdmin> INSERT INTO main.mysql_servers(hostgroup_id,hostname,port) VALUES (1,'mariadb2',3306);

ProxySQLAdmin> INSERT INTO main.mysql_servers(hostgroup_id,hostname,port) VALUES (1,'mariadb3',3306);
After adding three MySQL nodes into ProxySQL, you can store persistently readable data on ProxySQL. Cool, right? I think so.
ProxySQLAdmin> LOAD MYSQL SERVERS TO RUNTIME;

ProxySQLAdmin> SAVE MYSQL SERVERS TO DISK;

ProxySQLAdmin> SAVE MYSQL VARIABLES TO DISK;
After defining the config of saving to disk in ProxySQL, we can check the status of the three MariaDB cluster nodes we added earlier.
ProxySQLAdmin> SELECT * FROM mysql_servers;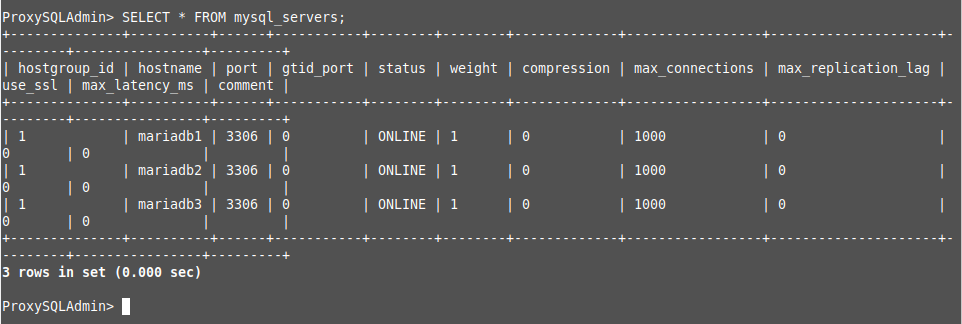
Conclusion: How to Deploy MySQL Cluster
With various software for replication, you can build a reliable database server according to your needs and create the apps. This post discusses configuring a MariaDB Galera Cluster, a type of MySQL cluster, with ProxySQL. We can learn much that we can do for load balancing and replication in the MySQL database. Before, we used load balancing with HAProxy. You can check it in this article.
If you liked this post, please let me know below. I would be pleased to know your thoughts as well. We have many similar posts on our blog if you want to read more. I will share a couple of relevant examples that might interest you. Here you go. MySQL master slave replication with docker and Load Balance in MySQL Using HAProxy. Let me know if you could easily follow the blog above. And I look forward to hearing from you about this. Have a good day.
Edited by: Syed Umar Bukhari.