Video Conferencing with Jitsi on K8s

Hello, are you as excited as I am? Well, you should be because, in this article, I will explain the steps to build a video conferencing Jitsi app with K8s. Jitsi is an open-source video conferencing app that uses webrtc technology. It is similar to video conferencing on Zoom, Skype, and Google Meet apps. Moreover, with Jitsi, you can be conferencing in a room with multiple people from any device!
Benefits of Video Conferencing with Jitsi on K8s:
You can install Jitsi on your own server and activate transcription, recording, share screen, etc. You can select conferencing for E2E and enable field password to activate end-to-end encryption.
In this article, you will learn to build a video conferencing app with Jitsi on Kubernetes (K8s) baremetal. In addition, I aim to use baremetal to install alsa-loopback on Ubuntu 20.04 and create a video conferencing recording with Jibri on Jitsi run appropriately. Moreover, I also want to help you build a video conferencing app with Jitsi on K8s. Note that you can use any other version of Linux too. In addition, if you don’t need the recording Jibri feature– you can manage Kubernetes from a cloud provider.
In this section, you will learn to set up Kubernetes in Ubuntu 20.04, install Nginx Ingress, load balancer, and set up Jitsi on Kubernetes (K8s). The requirements are listed below:
- Access to Ubuntu 20.04 for install Kubernetes with root access. However, you can also use any suitable OS version. In this section, I used Digital Ocean for a server. I use 3 servers to deploy Kubernetes.
- Kubectl.
- A domain name to access Jitsi public or private url.
Setting Nodes Master on Ubuntu 20.04
In this step, you will learn to build nodes and master Kubernetes. So, I have used Ubuntu 20.04 to install Kubernetes. But you can use any other version as well. After selecting your OS, login with ssh to your server. In this section, my hostname for the master is Ubuntu-k8s-sgp. Okay, let’s install this package for adding the repo:
root@ubuntu-k8s-sgp:~# apt update && apt install curl apt-transport-https -yThen, add GPG and key Kubernetes to Ubuntu 20.04 system.
root@ubuntu-k8s-sgp:~# curl -s https://packages.cloud.google.com/apt/doc/apt-key.gpg | sudo apt-key add -
root@ubuntu-k8s-sgp:~# echo "deb https://apt.kubernetes.io/ kubernetes-xenial main" | sudo tee /etc/apt/sources.list.d/kubernetes.list
Finally, perform a system update to collect the package list from the Kubernetes repository and install package.
root@ubuntu-k8s-sgp:~# apt update && apt -y install vim git curl wget kubelet kubeadm kubectl -y
root@ubuntu-k8s-sgp:~# sudo apt-mark hold kubelet kubeadm kubectl
After that, confirm the version of Kubernetes tools.
root@ubuntu-k8s-sgp:~# kubectl version
root@ubuntu-k8s-sgp:~# kubeadm version
Then, check the swap, and turn it off.
root@ubuntu-k8s-sgp:~# sed -i '/ swap / s/^\(.*\)$/#\1/g' /etc/fstab
root@ubuntu-k8s-sgp:~# swapoff -a
After turning off swap, enable kernel module.
root@ubuntu-k8s-sgp:~# sudo modprobe overlay
root@ubuntu-k8s-sgp:~# sudo modprobe br_netfilter
At this point, configure ip bridge and forward setting to sysctl.
root@ubuntu-k8s-sgp:~# tee /etc/sysctl.d/kubernetes.conf<<EOF
net.bridge.bridge-nf-call-ip6tables = 1
net.bridge.bridge-nf-call-iptables = 1
net.ipv4.ip_forward = 1
EOF
Lastly, reload sysctl. And you’re good to go!
sysctl --systemConfigure CRI-O for Master k8s
In this article, I have used CRI-O for container runtime on Kubernetes. It is an open-source alternative to docker. The goal is to replace docker with a container engine on Kubernetes, a community-driven container engine. So, first, we need to add the repository for CRI-O.
root@ubuntu-k8s-sgp-03:~# OS="xUbuntu_20.04"
root@ubuntu-k8s-sgp-03:~# VERSION=1.23
root@ubuntu-k8s-sgp-03:~# echo "deb https://download.opensuse.org/repositories/devel:/kubic:/libcontainers:/stable/$OS/ /" > /etc/apt/sources.list.d/devel:kubic:libcontainers:stable.list
root@ubuntu-k8s-sgp-03:~# echo "deb http://download.opensuse.org/repositories/devel:/kubic:/libcontainers:/stable:/cri-o:/$VERSION/$OS/ /" > /etc/apt/sources.list.d/devel:kubic:libcontainers:stable:cri-o:$VERSION.list
root@ubuntu-k8s-sgp-03:~# curl -L https://download.opensuse.org/repositories/devel:kubic:libcontainers:stable:cri-o:$VERSION/$OS/Release.key | apt-key add -
root@ubuntu-k8s-sgp-03:~# curl -L https://download.opensuse.org/repositories/devel:/kubic:/libcontainers:/stable/$OS/Release.key | apt-key add -
After adding repo, update the system and install CRI-O and runc.
root@ubuntu-k8s-sgp:~# apt update && apt install cri-o cri-o-runc -yFinally, CRI-O is now installed. Next, update the subnet cidr for CRIO.
sed -i 's/10.85.0.0/192.168.0.0/g' /etc/cni/net.d/100-crio-bridge.confAfter that, you need to start and enable CRI-O service.
root@ubuntu-k8s-sgp:~# systemctl daemon-reload
root@ubuntu-k8s-sgp:~# systemctl start crio
root@ubuntu-k8s-sgp:~# systemctl enable crio
After you have successfully installed CRI-O, you can configure Kubernetes with kubeadm init. Why? This command will help generate a token so that the Kubernetes nodes can join into the master nodes. Hence, you will be able to use multiple clusters on Kubernetes.
root@ubuntu-k8s-sgp:~# kubeadm init --pod-network-cidr=10.244.0.0/16But if you already have done init with kubeadm, you need run this command to make cluster running.
mkdir -p $HOME/.kube
sudo cp -i /etc/kubernetes/admin.conf $HOME/.kube/config
sudo chown $(id -u):$(id -g) $HOME/.kube/config
export KUBECONFIG=/etc/kubernetes/admin.conf
Then, save the kubeadm join token command; this will be useful when cluster nodes be joined to master. nodes.
How to Setup Nodes Cluster Kubernetes for video conferencing Jitsi on K8s
To setup nodes cluster on ubuntu 20.04 you need run the steps from setting nodes master to configure CRI-O. Similarly, you can use kubeadm join to join the nodes to master. After the command kubeadm is successful, you will get this output:
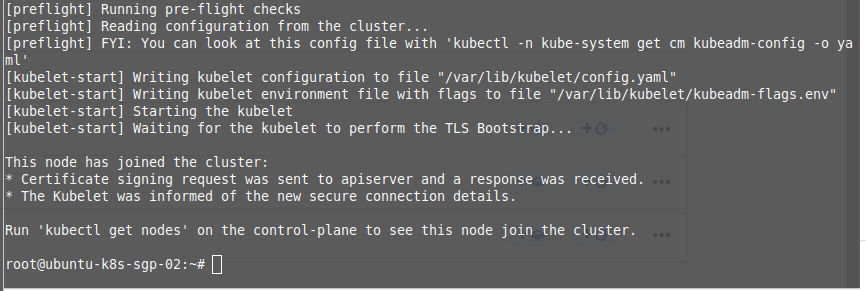
Check that the nodes have successfully joined to the master. Here I have used 1 master and 2 nodes cluster. Se, you will see 3 nodes when you run “kubectl get nodes”.
root@ubuntu-k8s-sgp:~# kubectl get nodes
Moreover, we can import Kubernetes config into our local laptop. Likewise, here I have used linuxmint on my computer. To run Kubernetes on my computer, I needed to install kubectl on my laptop. So, if you want to install kubectl, you can follow these steps.
curl -LO "https://dl.k8s.io/release/$(curl -L -s https://dl.k8s.io/release/stable.txt)/bin/linux/amd64/kubectl"
curl -LO "https://dl.k8s.io/$(curl -L -s https://dl.k8s.io/release/stable.txt)/bin/linux/amd64/kubectl.sha256"
echo "$(cat kubectl.sha256)  kubectl" | sha256sum --check
sudo install -o root -g root -m 0755 kubectl /usr/local/bin/kubectl
After installing kubectl, you can retrieve the Kubernetes config to the master nodes server using scp with the command “scp -r root@server_address:.kube .”

After importing the Kubernetes configuration to your laptop, check with the command “kubectl get nodes” to confirm the import was successful.

Installing Flannel for Video Conferencing Jitsi on K8s
Flannel is a virtual network layer in Kubernetes used with containers to connect, managed by CoreOS network designed for Kubernetes network interface. In addition, I used kubectl to install the flannel network.
kubectl apply -f https://github.com/coreos/flannel/raw/master/Documentation/kube-flannel.ymlMetallb for loadbalancer K8s
Metallb is a load balancer implementation for bare metal kubernetes clusters, using standard routing protocols. You can apply layer 2 for use our ip public to set public ip nodes cluster for our load balancer. Hence, I used the IP of node 2 for load balancer. Use helm charts to install metallb. After that, use helm to add metallb repository. If you don’t have helm in your laptop, you can install it by following the steps here.
helm repo add metallb https://metallb.github.io/metallbOnce you have added the metallb repository with helm cherts to your local laptop, you can allocate the IP address for the load balancer in config and install metallb with helm charts.
helm upgrade --install --namespace metallb-system --create-namespace --repo https://metallb.github.io/metallb metallb metallb --values - <<EOF
configInline:
  address-pools:
  - name: default
    protocol: layer2
    addresses:
    - ip_address_nodes/32
EOF
How to Install Nginx Ingress Controller
Nginx ingress controller is a controller provider that manage ingress so we can expose service pods on the Kubernetes. You can set domain allocation, secret certificate on Nginx Ingress. Let’s install Nginx with kubectl.
kubectl apply -f https://raw.githubusercontent.com/kubernetes/ingress-nginx/controller-v1.2.0/deploy/static/provider/cloud/deploy.yamlAfter you install Nginx Ingress, you can check the service using kubectl and check the ip load balancer from metallb is working properly on Nginx Ingress controller.
kubectl get svc -n ingress-nginx
Check load balancer public IP is running properly on Nginx Ingress using curl.
curl -v 165.232.161.25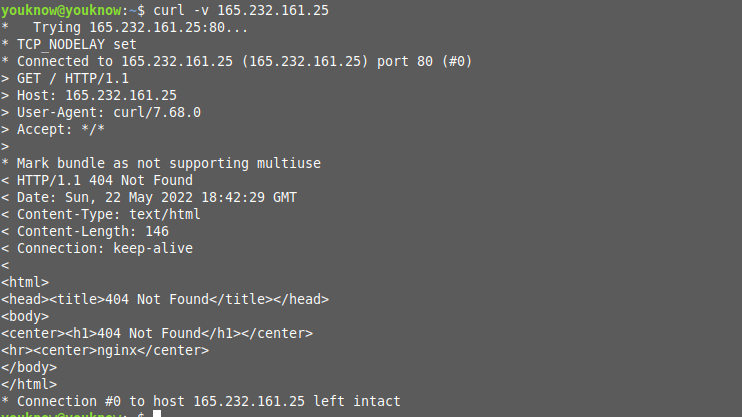
Install cert-manager in K8s
Cert-manager is a service in Kubernetes that manages certificates. With cert-manager, you can create issuers to generate, renew, and manage our certificates. Here’s how you can install cert-manager with helm.
helm repo add jetstack https://charts.jetstack.io
helm repo update
helm install \
  cert-manager jetstack/cert-manager \
  --namespace cert-manager \
  --create-namespace \
  --version v1.8.0 \
  --set installCRDs=true
Creating Video Conferencing Jitsi on K8s configurations
In this section, you will learn to configure video conferencing Jitsi on Kubernetes (K8s). So, the thing you need prepare is a domain to get Jitsi running and access a browser like Chrome, or Firefox. Here I have used “meet.bettercoffee.dev” domain for Jitsi public access. We need adding several environment for Jitsi configuration. Next, create a file for deployment of Jitsi web called web-deploy.yaml.
apiVersion: apps/v1
kind: Deployment
metadata:
  name: jitsi-web
  namespace: jitsi
spec:
  replicas: 1
  strategy:
    type: Recreate
  selector:
    matchLabels:
      app: jitsi-web
  template:
    metadata:
      labels:
        app: jitsi-web
    spec:
      containers:
        - name: jitsi-web
          ports:
          - containerPort: 80
          - containerPort: 443
          image: jitsi/web:stable-7001
          imagePullPolicy: IfNotPresent
          env:
            - name: ENABLE_XMPP_WEBSOCKET # added
              value: "1"
            - name: ENABLE_COLIBRI_WEBSOCKET
              value: "1"
            - name: DEPLOYMENTINFO_ENVIRONMENT
              value: "meet.bettercoffee.dev"
            - name: DEPLOYMENTINFO_ENVIRONMENT_TYPE
              value: "prod"
            - name: DEPLOYMENTINFO_REGION
              value: "Asia-central-1"
            - name: DEPLOYMENTINFO_SHARD
              value: "asia-central"
            - name: DEPLOYMENTINFO_USERREGION
              value: "Asia-central-1"
            - name: PUBLIC_URL # added
              value: "https://meet.bettercoffee.dev"
            - name: XMPP_SERVER
              value: "prosody.jitsi.svc.cluster.local"
            - name: JICOFO_AUTH_USER
              value: "focus"
            - name: JVB_TCP_HARVESTER_DISABLED
              value: "true"
            - name: XMPP_DOMAIN
              value: "meet.bettercoffee.dev"
            - name: XMPP_AUTH_DOMAIN
              value: "auth.meet.bettercoffee.dev"
            - name: XMPP_INTERNAL_MUC_DOMAIN
              value: "internal-muc.meet.bettercoffee.dev"
            - name: XMPP_BOSH_URL_BASE
              value: "http://prosody.jitsi.svc.cluster.local:5280"
            - name: XMPP_MUC_DOMAIN
              value: "muc.meet.bettercoffee.dev"
            - name: TZ
              value: "UTC"
            - name: DISABLE_HTTPS
              value: "1"
            - name: DOCKER_HOST_ADDRESS
              value: "192.168.1.1"
            - name: ENABLE_GUESTS
              value: "1"
            - name: XMPP_GUEST_DOMAIN
              value: "guest.meet.bettercoffee.dev"
            - name: DISABLE_AUDIO_LEVELS
              value: "0"
            - name: XMPP_RECORDER_DOMAIN
              value: "recorder.meet.bettercoffee.dev"
            - name: JIBRI_XMPP_USER
              value: "jibri"
            - name: JIBRI_XMPP_PASSWORD
              value: "Asababfa13AD"
            - name: JIBRI_BREWERY_MUC
              value: "jibribrewery"
            - name: JIBRI_RECORDER_USER
              value: "recorder"
            - name: JIBRI_RECORDER_PASSWORD
              value: "aDAGafa141afafa"
            - name: JIBRI_RECORDING_DIR
              value: "/config/recordings"
            - name: JIBRI_FINALIZE_RECORDING_SCRIPT_PATH
              value: "/config/finalize.sh"
            - name: JIBRI_STRIP_DOMAIN_JID
              value: "muc" # muc or conference
            - name: JIBRI_LOGS_DIR
              value: "/config/logs"
            - name: ENABLE_RECORDING
              value: "1"
            - name: ENABLE_WELCOME_PAGE
              value: "1"
            - name: ENABLE_CLOSE_PAGE
              value: "1"
            - name: ENABLE_P2P
              value: "0"
#            - name: ENABLE_NO_AUDIO_DETECTION
#              value: "1"
#            - name: ENABLE_NOISY_MIC_DETECTION
#              value: "1"
            - name: ENABLE_STATS_ID
              value: "1"
            - name: JIBRI_PENDING_TIMEOUT
              value: "0"
            - name: WEBSOCKET_KEEP_ALIVE
              value: "0"
            - name: ENABLE_PREJOIN_PAGE
              value: "0"
Create a service Jitsi meet web, this service is useful fot component pods jitsi can be connect with jitsi web.
create file web-service.yaml

apiVersion: v1
kind: Service
metadata:
  name: jitsi-web
  namespace: jitsi
spec:
  ports:
  - name: http
    port: 80
    targetPort: 80
  - name: https
    port: 443
    targetPort: 443
  selector:
    app: jitsi-web
After configuring the Jitsi web, prepare the deployment for prosody. Prosody is an xmpp server that is used to connect Jitsi webrtc. Then, create a file prosody-deploy.yaml.
apiVersion: apps/v1
kind: Deployment
metadata:
  name: prosody
  namespace: jitsi
spec:
  replicas: 1
  strategy:
    type: Recreate
  selector:
    matchLabels:
      app: prosody
  template:
    metadata:
      labels:
        app: prosody
    spec:
      containers:
        - name: prosody
          image: jitsi/prosody:stable-7001
          imagePullPolicy: IfNotPresent
          ports:
          - containerPort: 5222
          - containerPort: 5280
          - containerPort: 5347
          - containerPort: 5269
          env:
            - name: ENABLE_XMPP_WEBSOCKET # added
              value: "1"
            - name: XMPP_DOMAIN
              value: "meet.bettercoffee.dev"
            - name: LOG_LEVEL
              value: "debug"
            - name: XMPP_AUTH_DOMAIN
              value: "meet.bettercoffee.dev"
            - name: XMPP_MUC_DOMAIN
              value: "meet.bettercoffee.dev"
            - name: XMPP_MUC_MODULES
              value: "muc_meeting_id,muc_domain_mapper"
            - name: XMPP_INTERNAL_MUC_DOMAIN
              value: "internal-muc.meet.bettercoffee.dev"
            - name: JICOFO_COMPONENT_SECRET
              value: "abscdees"
            - name: JVB_AUTH_USER
              value: "jvb"
            - name: JVB_AUTH_PASSWORD
              value: "afa13ada"
            - name: JICOFO_AUTH_USER
              value: "focus"
            - name: JICOFO_AUTH_PASSWORD
              value: "adaad134"
            - name: TZ
              value: "UTC"
            - name: JVB_TCP_HARVESTER_DISABLED
              value: "true"
            - name: XMPP_TRUST_ALL_CERTS
              value: "true"
            - name: JIBRI_XMPP_USER
              value: "jibri"
            - name: JIBRI_XMPP_PASSWORD
              value: "Asababfa13AD"
            - name: JIBRI_BREWERY_MUC
              value: "jibribrewery"
            - name: JIBRI_RECORDER_USER
              value: "recorder"
            - name: JIBRI_RECORDER_PASSWORD
              value: "aDAGafa141afafa"
            - name: ENABLE_RECORDING
              value: "1"
            - name: JIBRI_USAGE_TIMEOUT
              value: "0"
            - name: ENABLE_LOBBY
              value: "0"
            - name: ENABLE_GUEST
              value: "1"
            - name: PUBLIC_URL
              value: "https://meet.bettercoffee.dev"
            - name: XMPP_RECORDER_DOMAIN
              value: "recorder.meet.bettercoffee.dev"
            - name: XMPP_CROSS_DOMAIN
              value: "true"
            - name: XMPP_GUEST_DOMAIN
              value: "guest.meet.bettercoffee.dev"
            - name: JIBRI_STRIP_DOMAIN_JID
              value: "muc"
We have created a prosody deployment. For the next step, let’s create a service for prosody.
create file name prosody-service.yaml

apiVersion: v1
kind: Service
metadata:
  name: prosody
  namespace: jitsi
spec:
  type: ClusterIP
  ports:
  - name: "5222"
    port: 5222
    targetPort: 5222
  - name: "5347"
    port: 5347
    targetPort: 5347
  - name: "5280"
    port: 5280
    targetPort: 5280
  selector:
    app: prosody
Then, create deployment of jicofo. Jicofo is a component on the Jitsi meet that manages the video conference with Jitsi components videobridge and Jibri for recording.
create file jicofo-deploy.yaml

apiVersion: apps/v1
kind: Deployment
metadata:
  name: jicofo
  namespace: jitsi
spec:
  replicas: 1
  strategy:
    type: Recreate
  selector:
    matchLabels:
      app: jicofo
  template:
    metadata:
      labels:
        app: jicofo
    spec:
      containers:
        - name: jicofo
          image: jitsi/jicofo:stable-7001 #5076 working one
          imagePullPolicy: IfNotPresent
          env:
            - name: XMPP_SERVER
              value: "prosody.jitsi.svc.cluster.local"
            - name: XMPP_DOMAIN
              value: "meet.bettercoffee.dev"
            - name: XMPP_AUTH_DOMAIN
              value: "auth.meet.bettercoffee.dev"
            - name: XMPP_INTERNAL_MUC_DOMAIN
              value: "internal-muc.meet.bettercoffee.dev"
            - name: JICOFO_COMPONENT_SECRET
              value: "abscdees"
            - name: JICOFO_AUTH_USER
              value: "focus"
            - name: JICOFO_AUTH_PASSWORD
              value: "adaad134"
            - name: TZ
              value: "UTC"
            - name: JVB_BREWERY_MUC
              value: "jvbbrewery"
            - name: ENABLE_RECORDING
              value: "1"
            - name: JIBRI_BREWERY_MUC
              value: "jibribrewery"
            - name: JIBRI_RECORDER_PASSWORD
              value: "aDAGafa141afafa"
            - name: JIBRI_XMPP_USER
              value: "jibri"
            - name: JIBRI_XMPP_PASSWORD
              value: "Asababfa13AD"
            - name: JIBRI_RECORDER_USER
              value: "recorder"
            - name: JIBRI_PENDING_TIMEOUT
              value: "0"
            - name: JICOFO_ENABLE_HEALTH_CHECKS
              value: "true"
            - name: XMPP_MUC_DOMAIN
              value: "muc.meet.bettercoffee.dev"
            - name: ENABLE_XMPP_WEBSOCKET
              value: "1"
            - name: XMPP_RECORDER_DOMAIN
              value: "recorder.meet.bettercoffee.dev"
Now, create a deployment for Jitsi videobridge, the Jvb component for Jitsi meet.
create file jvb-deploy.yaml.

apiVersion: apps/v1
kind: Deployment
metadata:
  name: jvb
  namespace: jitsi
spec:
  replicas: 1
  strategy:
    type: Recreate
  selector:
    matchLabels:
      app: jvb
  template:
    metadata:
      labels:
        app: jvb
    spec:
      containers:
        - name: jvb
          ports:
          - containerPort: 30300
            protocol: UDP
          - containerPort: 9090
          image: jitsi/jvb:stable-7001
          resources:
            limits:
               memory: "2G"
               cpu: "2"
            requests:
               memory: "1G"
               cpu: "1"
          imagePullPolicy: IfNotPresent
          env:
            - name: ENABLE_XMPP_WEBSOCKET
              value: "1"
            - name: ENABLE_COLIBRI_WEBSOCKET
              value: "1"
            - name: PUBLIC_URL
              value: "https://meet.bettercoffee.dev"
            - name: JVB_ENABLE_APIS
              value: "rest,colibri"
            - name: COLIBRI_REST_ENABLED
              value: "true"
            - name: XMPP_SERVER
              value: "prosody.jitsi.svc.cluster.local"
            - name: DOCKER_HOST_ADDRESS
              value: "192.168.1.1"
            - name: XMPP_DOMAIN
              value: "meet.bettercoffee.dev"
            - name: XMPP_AUTH_DOMAIN
              value: "auth.meet.bettercoffee.dev"
            - name: XMPP_INTERNAL_MUC_DOMAIN
              value: "internal-muc.meet.bettercoffee.dev"
            - name: JVB_STUN_SERVERS
              value: "stun.l.google.com:19302,stun1.l.google.com:19302,stun2.l.google.com:19302"
            - name: JICOFO_AUTH_USER
              value: "focus"
            - name: JVB_TCP_HARVESTER_DISABLED
              value: "true"
            - name: JVB_AUTH_USER
              value: "jvb"
            - name: JVB_PORT
              value: "30300"
            - name: JVB_AUTH_PASSWORD
              value: "afa13ada"
            - name: JICOFO_AUTH_PASSWORD
              value: "adaad134"
            - name: JVB_BREWERY_MUC
              value: "jvbbrewery"
            - name: TZ
              value: "UTC"
            - name: XMPP_MUC_DOMAIN
              value: "muc.meet.bettercoffee.dev"
Next, create a service for Jitsi videobridge.
filename is jvb-service.yaml

apiVersion: v1
kind: Service
metadata:
  name: jvb
  namespace: jitsi
spec:
  type: NodePort
  externalTrafficPolicy: Cluster
  ports:
  - name: "30300"
    port: 30300
    protocol: UDP
    targetPort: 30300
    nodePort: 30300
  - name: "4443"
    port: 4443
    targetPort: 4443
  - name: "9090"
    port: 9090
    targetPort: 9090
  selector:
    app: jvb
Here, you will create an issuer for the letsencrypt certificate.
create file jitsi-issuers.yaml

apiVersion: cert-manager.io/v1
kind: Issuer
metadata:
  name: web
  namespace: jitsi
spec:
  acme:
    server: https://acme-v02.api.letsencrypt.org/directory
    email: [email protected]
    privateKeySecretRef:
      name: letsencrypt-prod
    solvers:
      - http01:
          ingress:
            class: nginx
Next create an ingress so that we can use https for jitsi domain.
create file ingress-jitsi.yaml

apiVersion: networking.k8s.io/v1
kind: Ingress
metadata:
  labels:
    service: web
  namespace: jitsi
  name: web
  annotations:
    nginx.ingress.kubernetes.io/proxy-buffer-size: "32k"
    nginx.ingress.kubernetes.io/affinity: "cookie"
    nginx.ingress.kubernetes.io/rewrite-target: /
    nginx.ingress.kubernetes.io/proxy-connect-timeout: "600"
    nginx.ingress.kubernetes.io/proxy-read-timeout: "600"
    nginx.ingress.kubernetes.io/proxy-send-timeout: "600"
    nginx.ingress.kubernetes.io/proxy-body-size: "512m"
    kubernetes.io/ingress.class: "nginx"
    nginx.ingress.kubernetes.io/enable-cors: "false"
    nginx.ingress.kubernetes.io/cors-allow-origin: "*"
    nginx.ingress.kubernetes.io/rewrite-target: /$2
    nginx.ingress.kubernetes.io/use-regex: "true"
    cert-manager.io/issuer: "web"
spec:
  rules:
  - host: meet.bettercoffee.dev
    http:
     paths:
     - path: "/"
       pathType: Prefix
       backend:
         service:
           name: jitsi-web
           port:
             number: 80
  tls:
  - hosts:
    - meet.bettercoffee.dev
    secretName: jitsi-secret
Script for Deploying Video Conferencing Jitsi on K8s
In this steps, let’s create a bash script to deploy the Jitsi video conferencing K8s config. For the first, we will create namespace for the Jitsi service in bash.
Create file apply.sh

#/bin/bash
create namespace jitsi
kubectl apply -f prosody-deploy.yaml
kubectl apply -f prosody-service.yaml
kubectl apply -f jvb-deploy.yaml
kubectl apply -f jvb-service.yaml
kubectl apply -f jicofo-deploy.yaml
kubectl apply -f web-deploy.yaml
kubectl apply -f web-service.yaml
kubectl apply -f jitsi-issuers.yaml
kubectl apply -f jitsi-ingress.yaml
After that, run apply.sh script to deploy Jitsi video conferencing to Kubernetes (K8s). Don’t forget to point the public IP of the load balancer to public Jitsi domain.
chmod +x apply.sh
./apply.sh
namespace/jitsi created
deployment.apps/prosody created
service/prosody created
deployment.apps/jvb created
service/jvb created
deployment.apps/jicofo created
deployment.apps/jitsi-web created
service/jitsi-web created
issuer.cert-manager.io/web created
ingress.networking.k8s.io/web created
After running apply.sh script, check and confirm that Jitsi is running on the Kubernetes. To check Jitsi, add -n for specific namespace used on Kubernetes with this:
"kubectl get pods -n jitsi".
Below is the output you should expect to see:
 kubectl get pods -n jitsi
NAME                        READY   STATUS    RESTARTS   AGE
jicofo-77c84d8b5c-s54vn     1/1     Running   0          56m
jitsi-web-fc7f9b58f-xqqg6   1/1     Running   0          56m
jvb-7bfd675565-8zcrd        1/1     Running   0          56m
prosody-846dd4d4f-lphdl     1/1     Running   0          56m
As you can see, Jitsi is running well on Kubernetes.
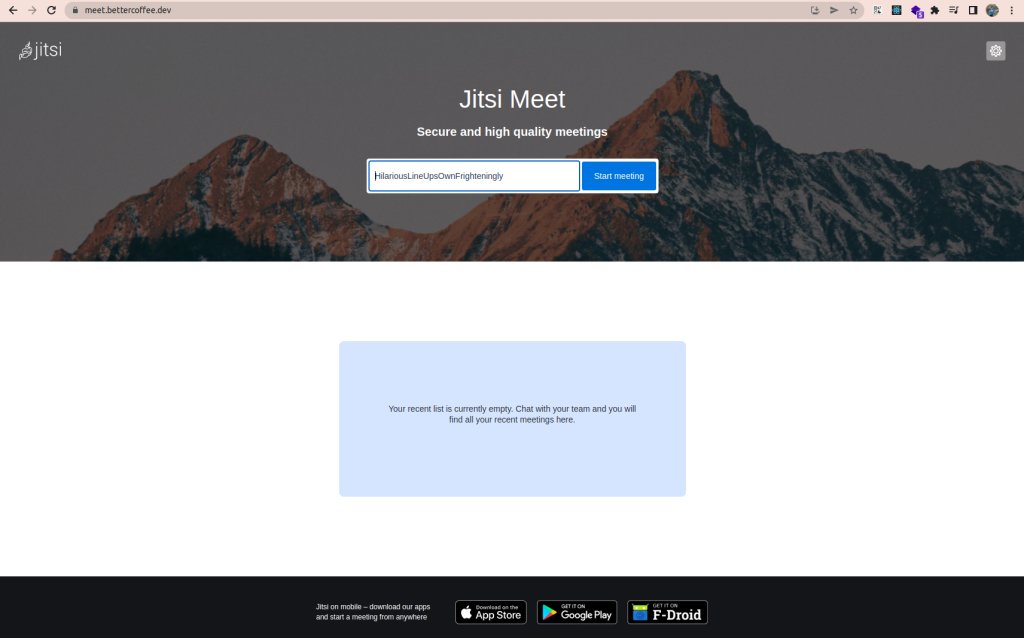
Testing Video Conferencing with Jitsi and K8s on the browser
In this section, let’s check Jitsi on our browser. I used Google Chrome here but you can use whichever browser you want to check video conferencing Jitsi on K8s.
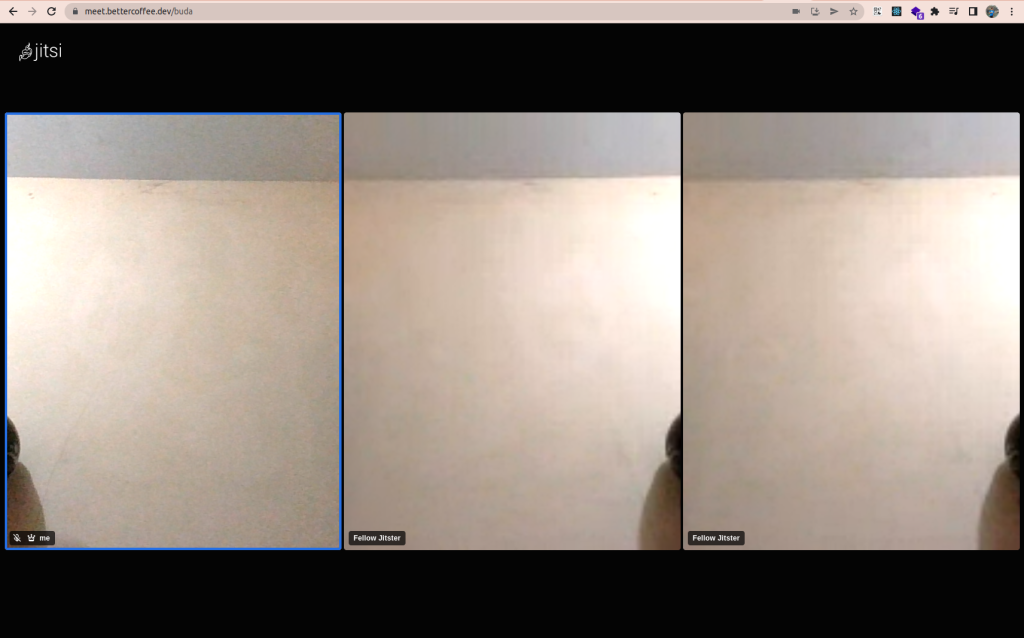
Wow, you have successfully deployed Jitsi on K8s! Isn’t that amazing!
Now, let’s create a room on Jitsi to try conference. Here, I tested with 3 participants, as you can see below:
Conclusion: How to Start Video Conferencing Jitsi on K8s
In conclusion, we discussed about deploying video conferencing with Jitsi on Kubernetes (K8s). If you want to deploy video conferencing with Jitsi on Docker, read Jitsi with Docker. You may also read on How to Deploy WordPress on Kubernetes or How to Setup Kubernetes Nodes.
I think Jitsi has many features, and of course, it is also open source. You can build your server and then install Jitsi. If you want to develop an e-learning platform, Jitsi is also helpful.
I believe it’s a great skill to learn today, and I am glad to have had the opportunity to write this for you. I hope you found this helpful and learned something meaningful from the post. Don’t forget to like or comment if you appreciate the post or have any queries. If you face an unavailable recording error on Jitsi, consult this post I wrote not long ago to fix it. Please do not hesitate to ask me.
Edited by: Syed Umar Bukhari