Continuing Your Journey with Kubernetes on AWS: Diving Deeper into EKS and ALB Ingress Controller
Continuing the Journey: Implementing Kubernetes Ingress with AWS ALB Ingress Controller
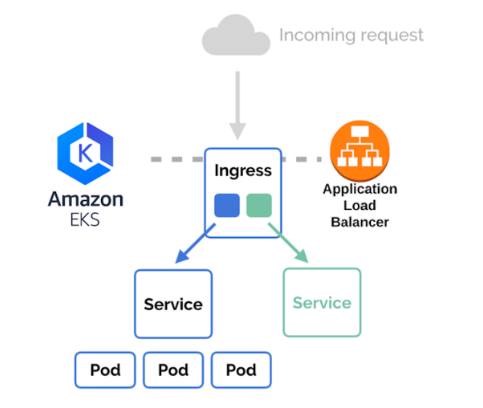
Welcome back, fellow Kubernetes enthusiasts! If you’ve been following our exploratory guide on mastering Kubernetes on AWS with EKS and the ALB Ingress Controller, then you’re in for a treat. In our previous posts, we ventured into setting up AWS Elastic Kubernetes Service (EKS) and deploying the AWS Application Load Balancer (ALB) Ingress Controller. Today, we’re going to dive deeper into the practical implementation and configuration of Kubernetes Ingress with the AWS ALB Ingress Controller.
Recap of Our Kubernetes and AWS ALB Setup
Let’s quickly recap what we’ve achieved so far:
- Set up an AWS EKS cluster to orchestrate our containerized applications.
- Installed the AWS ALB Ingress Controller to manage external access to our Kubernetes services.
With these foundations in place, we are now primed to implement Kubernetes Ingress using the ALB Ingress Controller. So, let’s roll up our sleeves and get started!
Why Use ALB Ingress Controller?
The AWS ALB Ingress Controller is a robust way to handle traffic routing from the external world into your Kubernetes cluster. Here’s why:
- Integration with AWS Services: ALB seamlessly integrates with AWS offerings like IAM, WAF, and Shield, providing enhanced security and performance.
- Advanced Load Balancing: It supports features like SSL termination, host-based routing, and path-based routing, making it highly versatile.
- Scalability: ALBs automatically scale to handle varying traffic loads, which is ideal for dynamic environments typical of Kubernetes workloads.
Setting Up AWS ALB Ingress Controller in Your EKS Cluster
First things first, ensure that your EKS cluster has the necessary IAM policy and roles attached. The controller will require permissions to automatically manage AWS resources on your behalf.
Configure IAM Policy
Create a policy that grants the necessary permissions. Here’s a sample policy JSON:
{
  "Version": "2012-10-17",
  "Statement": [
    {
      "Effect": "Allow",
      "Action": [
        "acm:DescribeCertificate",
        "acm:ListCertificates",
        "acm:GetCertificate",
        "ec2:AuthorizeSecurityGroupIngress",
        "ec2:CreateSecurityGroup",
        "ec2:CreateTags",
        "ec2:DeleteTags",
        "ec2:DeleteSecurityGroup",
        "ec2:DescribeInstances",
        "ec2:DescribeInstanceStatus",
        "ec2:DescribeSecurityGroups",
        "ec2:DescribeSubnets",
        "ec2:DescribeTags",
        "ec2:DescribeVpcs",
        "ec2:ModifyInstanceAttribute",
        "ec2:ModifyNetworkInterfaceAttribute",
        "ec2:RevokeSecurityGroupIngress",
        "elasticloadbalancing:AddListenerCertificates",
        "elasticloadbalancing:AddTags",
        "elasticloadbalancing:CreateListener",
        "elasticloadbalancing:CreateLoadBalancer",
        "elasticloadbalancing:CreateRule",
        "elasticloadbalancing:CreateTargetGroup",
        "elasticloadbalancing:DeleteListener",
        "elasticloadbalancing:DeleteLoadBalancer",
        "elasticloadbalancing:DeleteRule",
        "elasticloadbalancing:DeleteTargetGroup",
        "elasticloadbalancing:DeregisterTargets",
        "elasticloadbalancing:DescribeListeners",
        "elasticloadbalancing:DescribeLoadBalancers",
        "elasticloadbalancing:DescribeLoadBalancerAttributes",
        "elasticloadbalancing:DescribeRules",
        "elasticloadbalancing:DescribeSSLPolicies",
        "elasticloadbalancing:DescribeTags",
        "elasticloadbalancing:DescribeTargetGroups",
        "elasticloadbalancing:DescribeTargetHealth",
        "elasticloadbalancing:ModifyListener",
        "elasticloadbalancing:ModifyLoadBalancerAttributes",
        "elasticloadbalancing:ModifyRule",
        "elasticloadbalancing:ModifyTargetGroup",
        "elasticloadbalancing:ModifyTargetGroupAttributes",
        "elasticloadbalancing:RegisterTargets",
        "elasticloadbalancing:RemoveListenerCertificates",
        "elasticloadbalancing:RemoveTags",
        "elasticloadbalancing:SetIpAddressType",
        "elasticloadbalancing:SetSecurityGroups",
        "elasticloadbalancing:SetSubnets",
        "elasticloadbalancing:SetWebAcl",
        "iam:CreateServiceLinkedRole",
        "iam:GetServerCertificate",
        "iam:ListServerCertificates",
        "cognito-idp:DescribeUserPoolClient",
        "waf-regional:GetWebACLForResource",
        "waf-regional:GetWebACL",
        "waf-regional:AssociateWebACL",
        "waf-regional:DisassociateWebACL",
        "tag:GetResources",
        "tag:TagResources",
        "waf:GetWebACL"
      ],
      "Resource": "*"
    }
  ]
}
Next, attach this policy to an IAM role and bind this role to the service account used by the ALB Ingress Controller.
Deploy the ALB Ingress Controller
Ensure you have Helm installed. If not, you can set it up from the official Helm documentation. Here’s a command to deploy the controller using Helm:
helm repo add eks https://aws.github.io/eks-charts
helm repo update
helm install aws-load-balancer-controller eks/aws-load-balancer-controller -n kube-system \
    --set clusterName= \
    --set serviceAccount.create=false \
    --set region= \
    --set vpcId=
Replace <YOUR_CLUSTER_NAME>, <AWS_REGION>, and <YOUR_VPC_ID> with your actual cluster name, AWS region, and VPC ID respectively.
Creating an Ingress Resource
Now that our ALB Ingress Controller is in place, let’s create an Ingress resource to manage traffic routing. Below is a sample Kubernetes Ingress resource:
apiVersion: networking.k8s.io/v1
kind: Ingress
metadata:
  name: my-ingress
  namespace: default
  annotations:
    alb.ingress.kubernetes.io/scheme: internet-facing
    alb.ingress.kubernetes.io/tags: Environment=dev,Team=test
spec:
  rules:
    - host: myapp.example.com
      http:
        paths:
          - path: /*
            pathType: ImplementationSpecific
            backend:
              service:
                name: my-service
                port:
                  number: 80
This example routes traffic from myapp.example.com to the service my-service on port 80. Adjust the annotations and specifics to fit your setup.
Testing and Validation
After applying your Ingress resource using kubectl apply -f my-ingress.yaml, it’s time to test! Ensure your DNS settings are correctly configured to point to the generated ALB hostname. You can retrieve the hostname using:
kubectl get ingress my-ingress -o jsonpath='{.status.loadBalancer.ingress[0].hostname}'
Conclusion
Bravo! You’ve successfully configured Kubernetes Ingress using the AWS ALB Ingress Controller in your EKS cluster. This setup empowers your cluster with a robust traffic management solution, leveraging AWS’s scalable infrastructure. Don’t forget to explore the Kubernetes Ingress documentation to unlock more advanced features.
Stay tuned for more insights and tutorials on Kubernetes and cloud-native technologies. Keep experimenting, keep innovating, and remember to enjoy the journey of mastering Kubernetes on AWS!
Happy coding!
Thomas A. Anderson
Mass-produced in late 2022, upgraded frequently. Has opinions about Kubernetes that he formed in roughly 0.3 seconds. Occasionally flops — but don't we all? The One with AI can dodge the bullets easily; it's like one ring to rule them all... sort of...